What your bumper repair shop isn't telling you
By Kiss János 14 min read
Why bumper damage is never just cosmetic
Two damaged bumpers can look identical from the driver’s seat. One needs $200 of sanding and touch-up paint. The other is hiding $2,000 worth of bent metal, crushed foam, and a radar sensor that now points slightly toward the ditch.
That gap is where most bumper repair surprises come from.
Your bumper is not a single piece of plastic. It’s a layered safety system, and the painted shell you see is designed to hide everything underneath it.
This guide covers what actually sits behind the cover, how shops decide between repair and replacement, and which factors drive cost. It also explains ADAS calibration, how to document damage for insurance, and how to vet a shop before you hand over your keys.
And yes, this applies even to that slow-speed parking lot bump. A 5 mph tap can crack a mounting bracket or shift a sensor without leaving more than a scuff.
The plastic cover is good at looking fine.
That’s literally its job.
What’s hidden behind the plastic cover
Most online guides to bumper repair stop at the paint. They explain how to buff out scratches or fill a small crack, then call it done.
But the outer shell is the least important part of the system from a safety standpoint.
Think of it like a mattress.
The fabric cover is what you see and touch, but the springs and foam underneath do the real work. Damage to the inner layers changes how the whole thing performs, even if the cover looks smooth.
The layers you don’t see
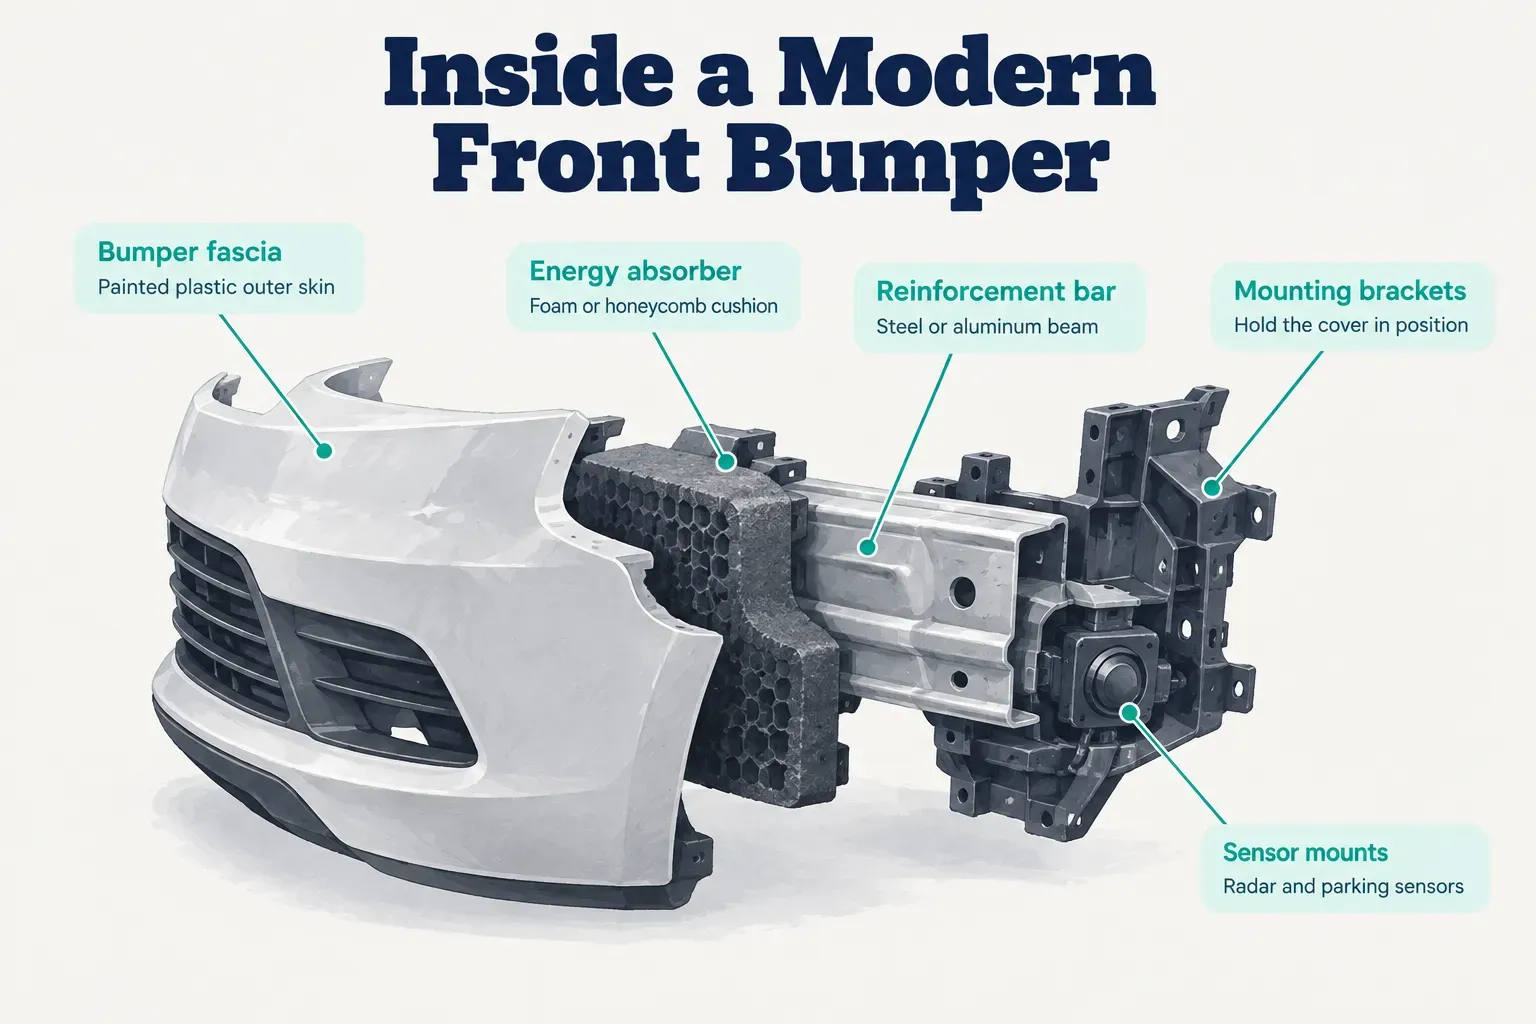
The visible part is the bumper cover, also called the bumper fascia. It’s usually a flexible thermoplastic, painted to match the car, and it handles aerodynamics and appearance.
It absorbs almost no crash energy on its own.
Behind it sits the energy absorber, a block of foam or a plastic honeycomb structure that compresses during low-speed impacts. Behind that is the bumper reinforcement, a steel or aluminum beam bolted to the vehicle’s frame rails.
This bar is the component that actually protects your radiator, headlights, and frame.
Then there’s the hardware that holds everything together:
Mounting brackets and side retainers that position the cover, bumper mounting tabs molded into the plastic, push clips and screws, wiring harnesses for fog lights and sensors, and dedicated mounts for radar units, ultrasonic parking sensors, and cameras. On a 2026 vehicle with a full driver-assistance suite, a front bumper can carry six or more sensors.
When a clean-looking bumper still fails
Here’s the uncomfortable truth.
Every one of those inner components can fail while the paint stays perfect.
Flexible plastic is designed to deform and spring back. So the cover pops out to its original shape, while the reinforcement bar behind it stays bent by half an inch.
A foam absorber can crush and never recover, which means it won’t cushion the next impact at all.
Other hidden failures are even more common:
Broken bumper clips and cracked brackets often show up as a slightly uneven panel gap or a cover that wiggles when you press on it. A radar sensor knocked a degree or two off-axis may not trigger a warning light.
But at highway distances, a two-degree error can mean the system is tracking the wrong lane.
A bumper that looks undamaged can still have a bent reinforcement bar, a crushed absorber, or a misaligned radar. The paint tells you almost nothing about structural condition.
This is why a professional vehicle safety inspection matters after any impact that leaves a scuff, a loose trim piece, or an uneven gap. The cover has to come off for anyone to see what really happened.
Visual inspection from the outside is guesswork.
Repair or replace: Making the call
There is no universal rule that says “cracks under three inches get repaired.”
Anyone who tells you otherwise is oversimplifying. Repairability depends on four things: the type of plastic, where the damage sits, how big it is, and what the automaker’s own procedures allow.
A good shop works through all four before quoting. A rushed shop picks whichever answer is faster.
When plastic can actually be welded
Start with plastic identification.
Nearly every bumper cover has a code molded into the back, such as >TPO<, >PP+EPDM<, or >PC/PBT<. That code tells the technician which repair methods will work.
TPO (thermoplastic olefin) and polypropylene blends are the most common cover materials. They respond well to plastic welding using a matching filler rod, because the plastic melts and fuses back together.
PC/ABS and PC/PBT blends are stiffer and less forgiving, and they often do better with adhesive plastic repair using two-part structural adhesives.
Use the wrong rod or the wrong adhesive and the repair will look fine for a few months… then crack along the same line.
Material matching is not optional.
One-sided scuffs vs. through-and-through cracks
A one-sided repair addresses damage that only affects the outer surface. Gouges, deep scratches, and light abrasions can be sanded, filled with flexible plastic filler, primed, and painted without removing the cover in some cases.
A crack, tear, or puncture that passes all the way through the panel is a different job. It needs a two-sided repair: the cover comes off, the back side gets reinforced with welding or adhesive and backing mesh, and only then is the front refinished.
Skipping the back-side reinforcement is one of the most common shortcuts in cheap bumper work. It’s also why those repairs crack again when the car goes over a speed bump in cold weather.
Sensor zones manufacturers won’t let you repair
Many automakers now publish OEM repair procedures that explicitly prohibit repairs in certain areas. These typically include sensor retainers, the zone directly in front of a radar unit, and the mounting points for parking sensors.
Why?
Radar signals pass through the bumper cover. Filler, extra paint thickness, or a welded seam changes how that signal travels, which can skew distance and angle readings.
Some manufacturers also restrict or prohibit reconditioned covers on radar-equipped models for the same reason.
Paint film thickness matters too.
Several OEMs specify maximum paint build in front of radar, and exceeding it by even a small margin can trigger calibration failures.
The practical rule of thumb looks like this.
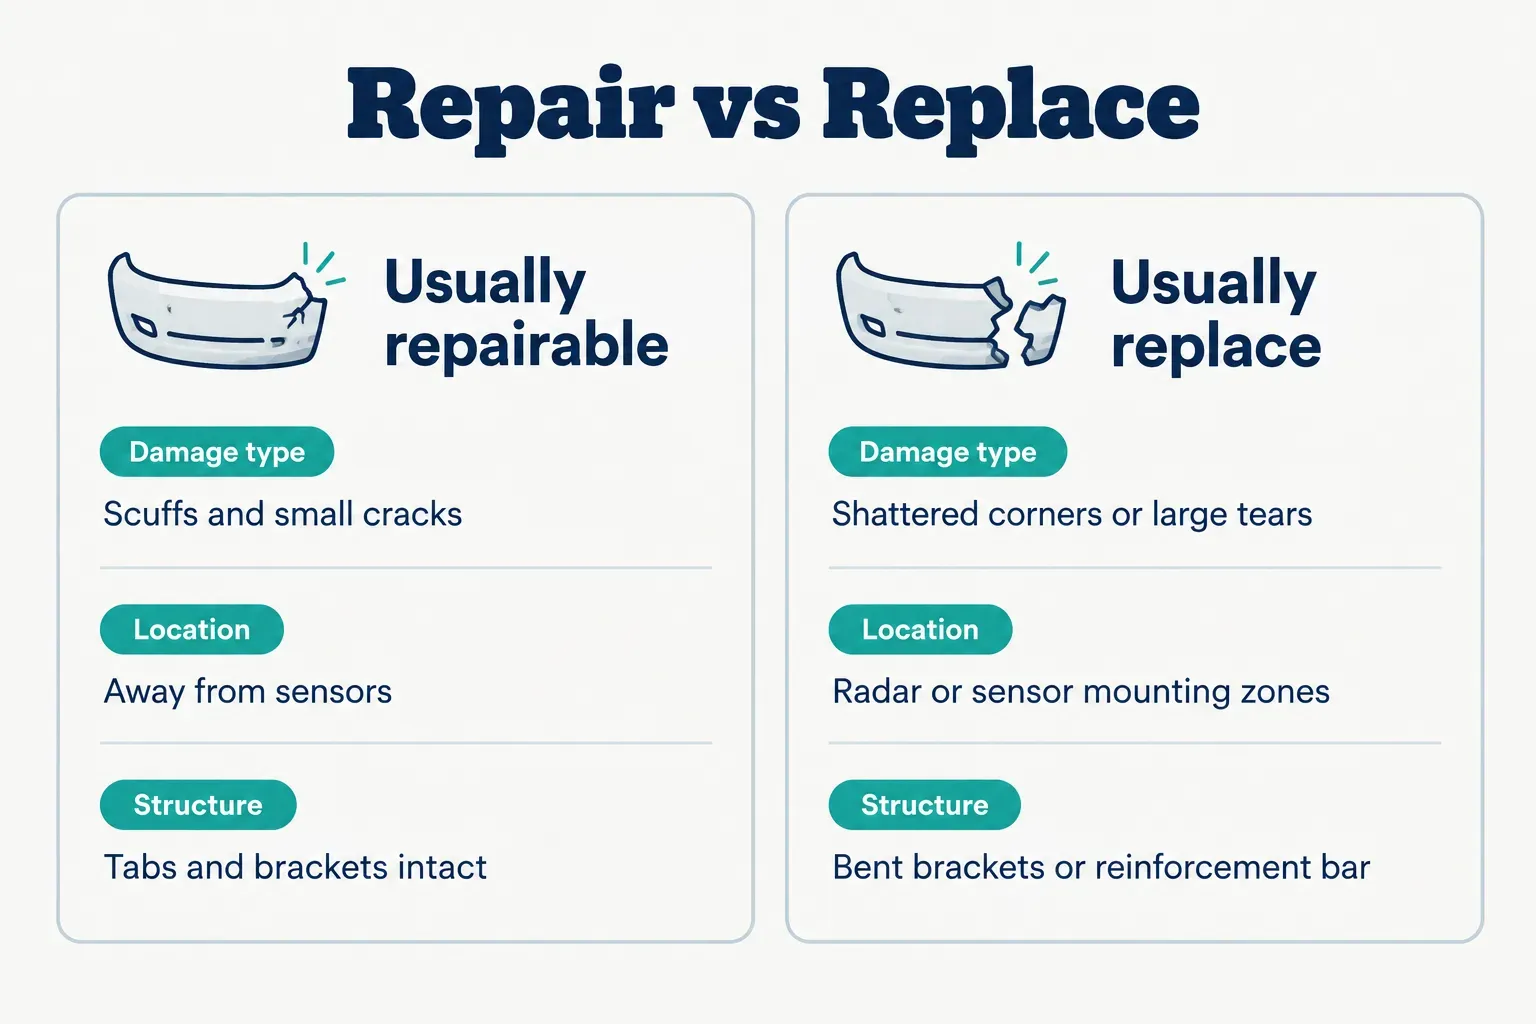
Surface scuffs and small cracks away from sensors are often repairable.
Shattered corners, damage in sensor or radar zones, missing chunks of plastic, or bent brackets usually mean replacement.
Cost, timing, and driving safety
The quote that surprises people is rarely the plastic.
It’s everything stacked around it.
A bumper cover might cost $350, but paint blending, scans, and calibration can push the final bill well past $1,500 on a sensor-equipped car.
AAA research has found that ADAS-related work can account for more than a third of total repair costs on minor front and rear collisions. Here’s where the money actually goes, using typical U.S. ranges as of 2026.
| Cost driver | Typical range (2026, U.S.) | What pushes it higher |
|---|---|---|
| Paint matching and blending | $200 to $600 for cover plus adjacent panels | Tri-coat pearls, matte finishes, blending into fenders or quarter panels |
| OEM bumper cover | $300 to $1,200 (unpainted) | Luxury brands, sensor cutouts, integrated grilles or trim |
| Aftermarket cover | $100 to $450 | Certified (CAPA) parts cost more; fit issues can add labor |
| Reconditioned or recycled cover | $150 to $400 | Limited availability; some OEMs restrict use near radar |
| Body labor rate | $60 to $180 per hour | Metro areas, dealer-affiliated shops, OEM-certified facilities |
| Pre-repair and post-repair diagnostic scan | $50 to $250 per scan | Dealer-level software, multiple modules, European brands |
| Static calibration (target-based) | $150 to $600 per sensor | Large target boards, level floor requirements, multiple sensors |
| Dynamic calibration (road drive) | $100 to $400 per sensor | Specific road and weather conditions, repeat attempts |
| Supplemental damage estimate | Often adds 20% to 60% to the initial quote | Hidden bracket, absorber, or reinforcement damage found at teardown |
That last row catches most people off guard.
A supplemental damage estimate isn’t a scam.
It’s what happens when the cover comes off and the shop finally sees the layers underneath.
How long a repair really takes
Cosmetic repairs often take 1 to 2 days. That covers scuff repair, small crack welding, refinishing, and paint cure time.
Replacement with calibration usually runs 3 to 5 days, sometimes longer. Parts availability is the biggest variable, since some OEM covers and sensor brackets are still back-ordered for a week or more in 2026.
Dynamic calibrations can also stall if the car needs a specific road type or dry weather to complete the drive cycle.
Is it safe to drive with a damaged bumper?
Sometimes yes. Sometimes absolutely not.
Park the car until it’s inspected if you see exposed metal edges, a loose fascia hanging near the tires, cracked or obstructed headlights or taillights, or warning lights for parking assist, blind-spot monitoring, or adaptive cruise. A cover that drags or flaps at highway speed can tear off and become a hazard for drivers behind you.
And a disabled sensor means safety features you rely on may quietly stop working.
DIY fixes: What’s actually safe to try at home
Light paint transfer removal is fair game. A clay bar, a dedicated polishing compound, and a microfiber towel can lift scuff marks from another car or a painted pole in about 20 minutes.
Beyond that, the risks climb fast.
Heat guns can warp plastic and ignite foam absorbers. Generic plastic welding kits release toxic fumes and rarely match your bumper’s material. Heavy body filler cracks on flexible panels and, without proper adhesion promoter, prevents paint from bonding correctly.
A failed DIY job can turn a $300 repair into a full replacement.
From estimate to a finished, verified repair
The best protection you have isn’t negotiating skill.
It’s documentation.
Owners who photograph damage early and demand itemized estimates rarely get blindsided by supplements or sloppy work.
What a complete estimate should include
A collision repair estimate should read like a parts list, not a single lump sum. Follow these steps before you sign anything.
- Photograph the damage first. Shoot from at least six angles, including low shots underneath the bumper and close-ups around every sensor, before the car goes to a shop or you file an insurance claim. Timestamped photos settle disputes later.
- Confirm the part classification. Every part on the estimate should be labeled OEM, aftermarket, or reconditioned. If aftermarket and recycled parts appear near radar zones, ask whether the automaker permits them.
- Check labor hours line by line. Removal, repair, refinish, and reinstallation should each have their own hours. Vague “body labor” entries make it impossible to compare quotes.
- Look for paint and blend charges. A realistic estimate includes blending into adjacent panels for color match. If it doesn’t, expect a visible color shift in sunlight.
- Verify diagnostic scans are listed. A pre-repair and post-repair diagnostic scan should appear as separate line items. No scan means no proof that sensors and modules work afterward.
- Ask about supplements upfront. The estimate should note that hidden damage found during teardown may require a supplemental estimate. Ask the shop to contact you with photos before any added work begins.
The repair and calibration process
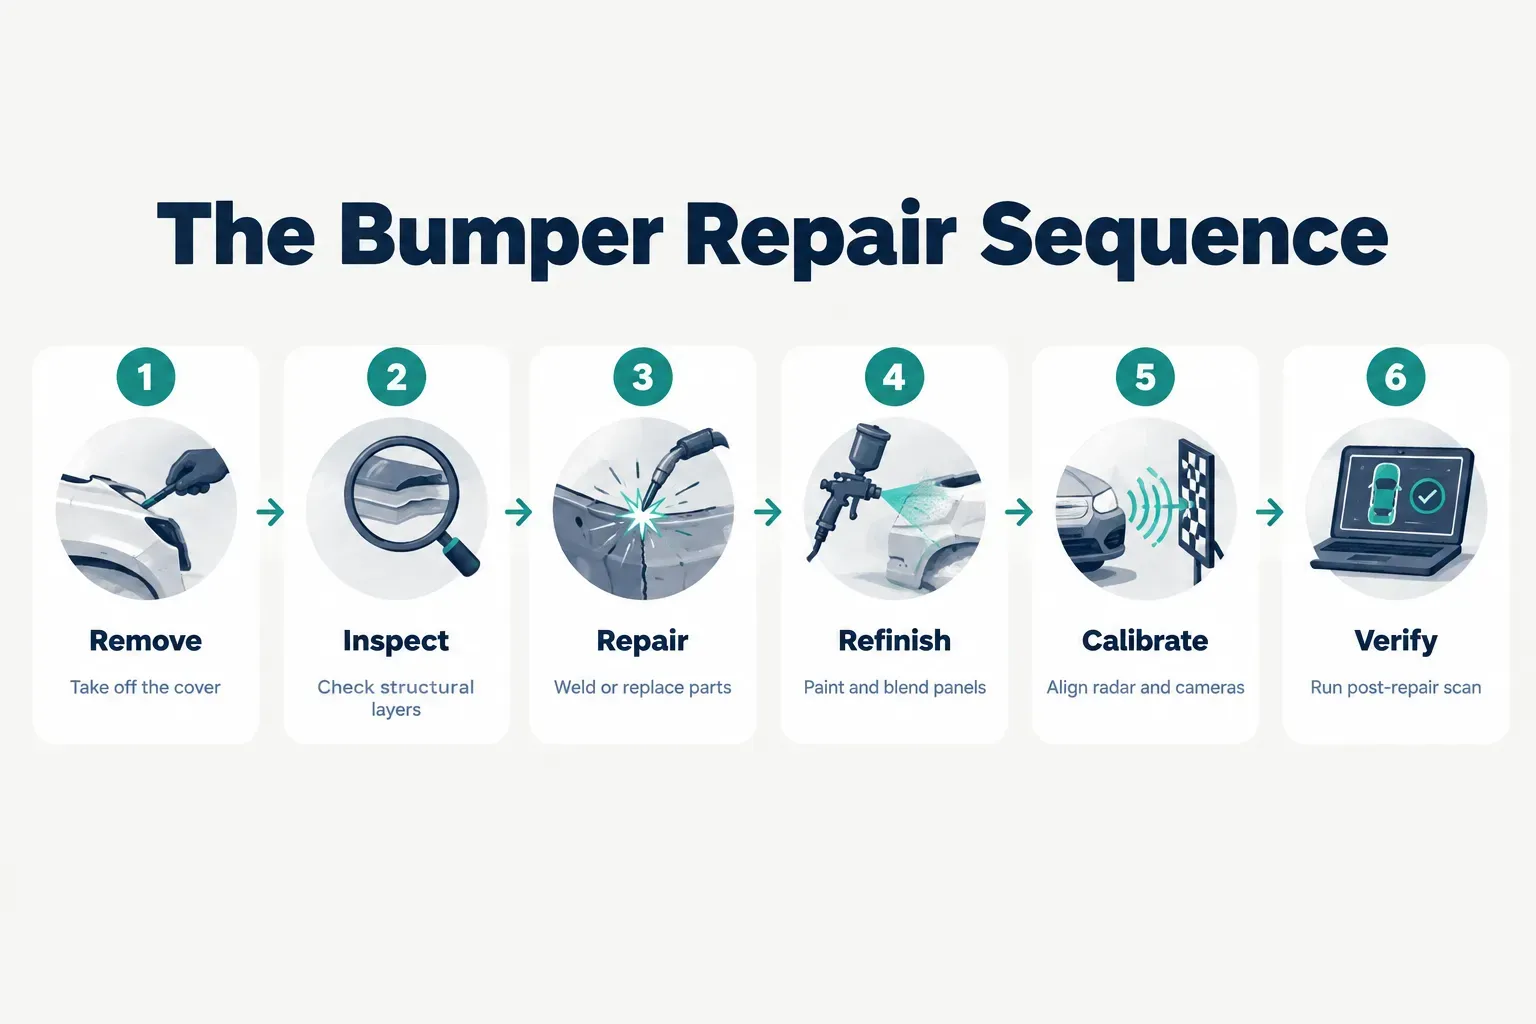
A complete repair follows a predictable sequence. If a shop skips steps, you’ll usually see it in the final invoice or in a warning light two weeks later.
- Safety prep for EVs and newer models. Electric and hybrid vehicles may require a high-voltage safety lockout before bumper removal, along with manufacturer-specific procedures. Ask whether the shop has trained technicians for your make.
- Cover removal. The technician disconnects sensors and lighting harnesses, then removes the fascia. This is where hidden damage becomes visible.
- Structural inspection. The reinforcement bar, energy absorber, brackets, and mounting tabs are checked for bends, crushing, and cracks. Any finding here should trigger a supplement with photos.
- Repair or replacement. Plastic is welded or bonded per material type, or new parts are installed. Damaged clips and brackets should be replaced, not glued back together.
- Paint and blend. The cover is primed with adhesion promoter, painted, and blended into neighboring panels. Paint thickness in radar zones should stay within OEM limits.
- ADAS calibration. Sensors receive static calibration with targets, dynamic calibration on the road, or a verification drive, depending on OEM requirements. Proper radar sensor alignment is what keeps automatic braking accurate.
- Post-repair scan. A final scan confirms no stored fault codes remain. Request a printed or digital copy for your records.
Choosing and verifying a trustworthy shop
Not every body shop can calibrate radar.
Many outsource it, which adds days and a second set of hands to the job. Vet the shop before booking, then inspect the work before paying.
- Confirm plastic repair capability. Ask whether they weld TPO in-house and how they handle two-sided repairs. A shop that only replaces covers may push replacement when repair would work.
- Ask to see calibration equipment. Target boards, alignment racks, and dealer-level scan tools should be on-site, or the shop should name the calibration partner it uses.
- Read the repair warranty. A solid repair warranty covers paint and workmanship for the life of your ownership. Get it in writing.
- Check your state’s insurance rules. Some states guarantee your right to choose any shop, while others allow insurers to require a second estimate. Confirm details with your policy and your state insurance regulator before committing.
- Compare verified reviews. Apps like Frendex let owners compare verified local auto repair providers, read ratings from completed bookings, and message a shop directly to confirm calibration capability before committing. Ratings tied to real jobs are far harder to fake than anonymous reviews.
- Run a repair quality inspection at pickup. Check panel gaps against the opposite side, paint texture and color match in daylight, and that every fastener is reinstalled. Then confirm no dashboard warning lights, test parking sensors by backing toward a wall slowly, verify blind-spot alerts on a multi-lane road, and check adaptive cruise response before driving off the lot for good.
The bottom line on bumper damage
Here’s the decision rule.
If the damage is cosmetic and away from sensors, get a written estimate before anyone talks you into replacement.
If it’s near a sensor or bracket, or the cover moves when you push it, get a professional inspection before driving much further.
The single most protective thing you can do tonight? Photograph the damage from every angle, including underneath.
And skip the heat gun and filler, especially near structural or sensor areas.
The cheapest quote is rarely the best value. A transparent, itemized estimate from a provider who can show you real calibration equipment and ratings from completed bookings is worth far more.
That’s what gets you a bumper that looks right and works right.
Frequently asked questions
Is it cheaper to repair or replace a bumper?
Repair is usually cheaper when the damage is cosmetic and away from sensors. A scuff or small crack might cost $250 to $600 to fix. Replacement becomes cost-competitive once calibration, structural parts like brackets or absorbers, and multi-panel paint blending stack up, since a repair in those situations often needs the same calibration work anyway.
How long does it take to repair a bumper?
Minor cosmetic bumper repair can often be finished the same day or within 1 to 2 days. Jobs that involve replacement parts, structural repair, or ADAS calibration typically take 3 to 5 days. Back-ordered OEM parts can stretch that to a week or more.
Can a plastic bumper be repaired after a crack?
Yes, small to medium cracks away from sensor zones are often repairable. Success depends on the plastic type and the automaker's procedures. TPO and polypropylene covers weld well, while stiffer blends may need adhesive repair. Large cracks, shattered sections, or cracks in radar and sensor areas typically require replacement.
Can I drive with a cracked front bumper?
Driving short distances is usually fine for a purely cosmetic crack. If the cover is loose, sagging near a tire, exposing metal edges, or blocking a light, get it inspected before driving further. Any ADAS warning light also means a safety feature may be offline.
Does bumper damage affect sensors?
Yes, bumper impacts can misalign radar units, ultrasonic parking sensors, and cameras even when the sensors look intact. A shift of one or two degrees may not trigger a warning light but can affect how blind-spot monitoring or automatic braking performs. A diagnostic scan and parking sensor inspection, followed by calibration if needed, is the only reliable way to confirm accuracy.
Will insurance pay for a bumper repair?
Most collision policies cover bumper damage from accidents, and comprehensive covers non-collision events like falling objects, minus your deductible. Coverage details vary widely. Shop choice rules, OEM-parts clauses, and calibration coverage differ by insurer and by state, so review your policy before authorizing work.
Need a hand with something?
The Frendex map shows you who is available near you, in real time.
Get the app free Get the app freeFree, no card needed
Related articles
Windshield replacement cost: A 2026 pricing breakdown
See real 2026 quotes from $250 to $1,500+ and why ADAS calibration changes the price. Four line items explain every quote you'll get.
Is your car asking for a wheel alignment?
Learn the real symptoms of bad alignment vs tire balance or wear issues. See what a technician checks and how to read your shop report before paying.
How much does a locksmith cost in 2026?
See what locksmiths actually charge in 2026, trip fees, labor, and parts included. Real job costs and hidden add-ons before you book a call.