Brow lamination: What it does and how to stay safe
By Kiss János 12 min read
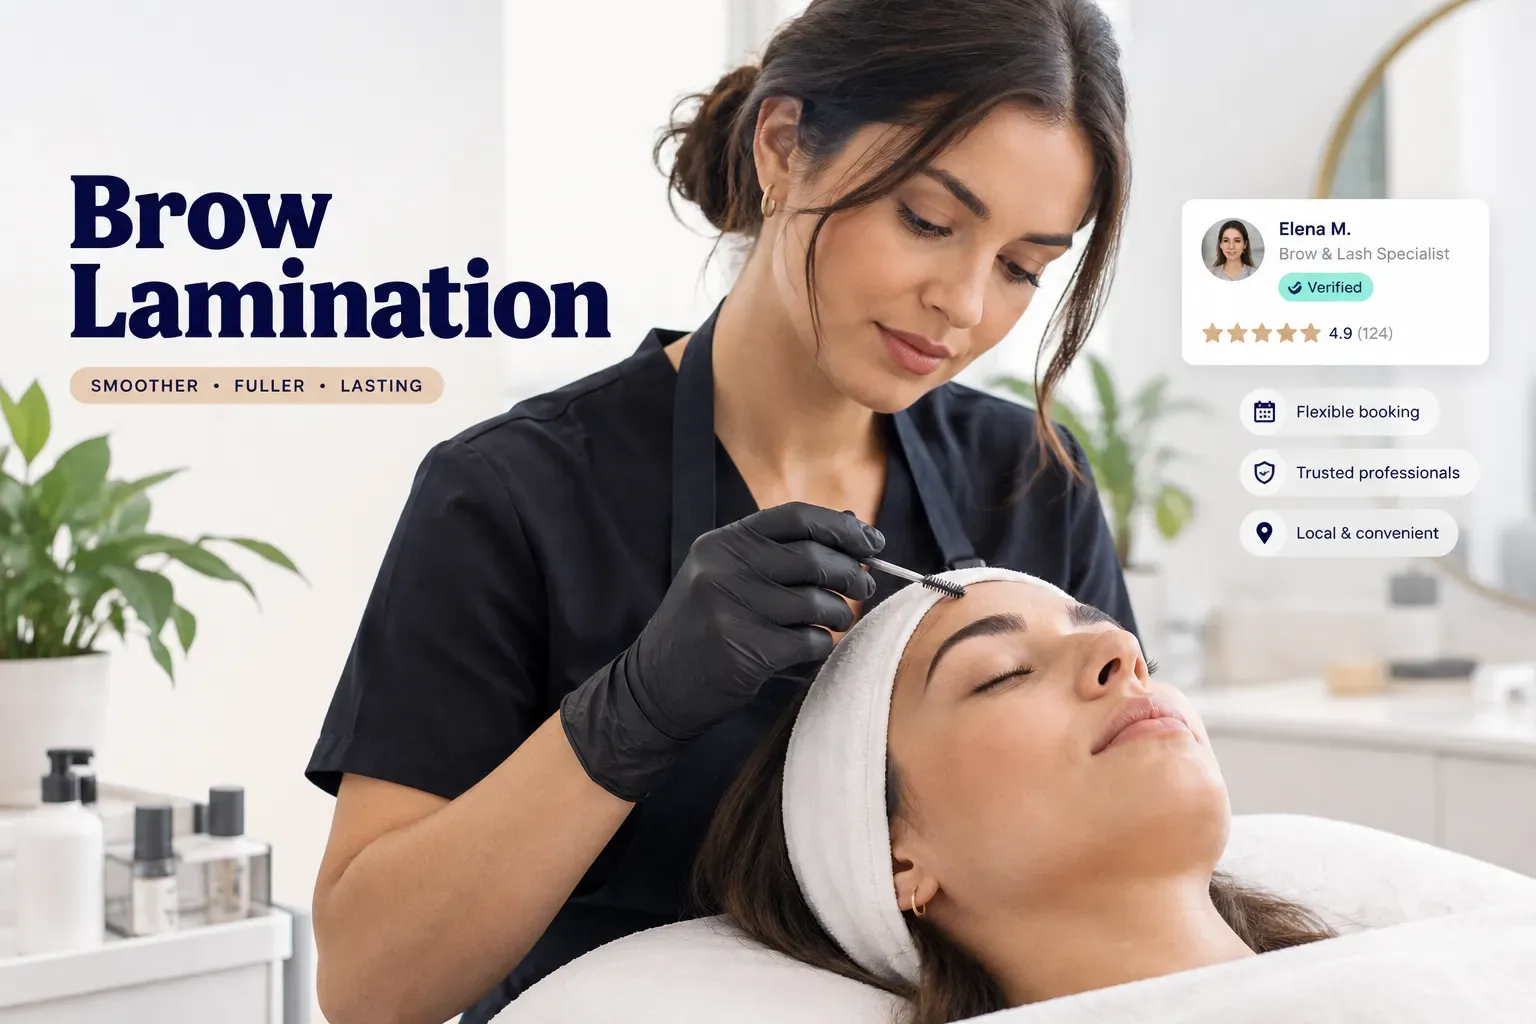
What brow lamination actually is
Brow lamination looks like a styling service.
Chemically, it’s closer to a perm.
Brow lamination is a chemical brow treatment that breaks and rebuilds the internal bonds of your eyebrow hairs so they hold a new shape for weeks.
That’s why you’ll also see it called an eyebrow perm, a brow lift, or brow sculpting. The technician applies a perming solution, brushes your hairs into a uniform upward or sideways direction, and then locks that position in place.
The result is the brushed-up, fluffy, “just groomed” brow that has dominated social feeds since around 2019 and remains one of the most requested salon services as of 2026.
But lamination has limits.
It redirects and flattens the hairs you already have, which can make brows look fuller and more even. It cannot grow new hair, and it won’t permanently fill sparse patches or scars.
If there’s no hair in a spot, there’s nothing to lift.
Most guides stop at before-and-after photos.
This one doesn’t.
Because you’re applying reactive chemicals a few centimeters from your eyes, the questions that matter most are often skipped: what you’re actually being exposed to, what overprocessing looks like, and how to tell a careful provider from a risky one.
How the treatment works on your hair
Every eyebrow hair is held together by thousands of tiny chemical links. Lamination temporarily cuts those links, repositions the hair, and reconnects it in a new shape.
Understanding that process explains almost every risk that follows.
What happens to the hair structure
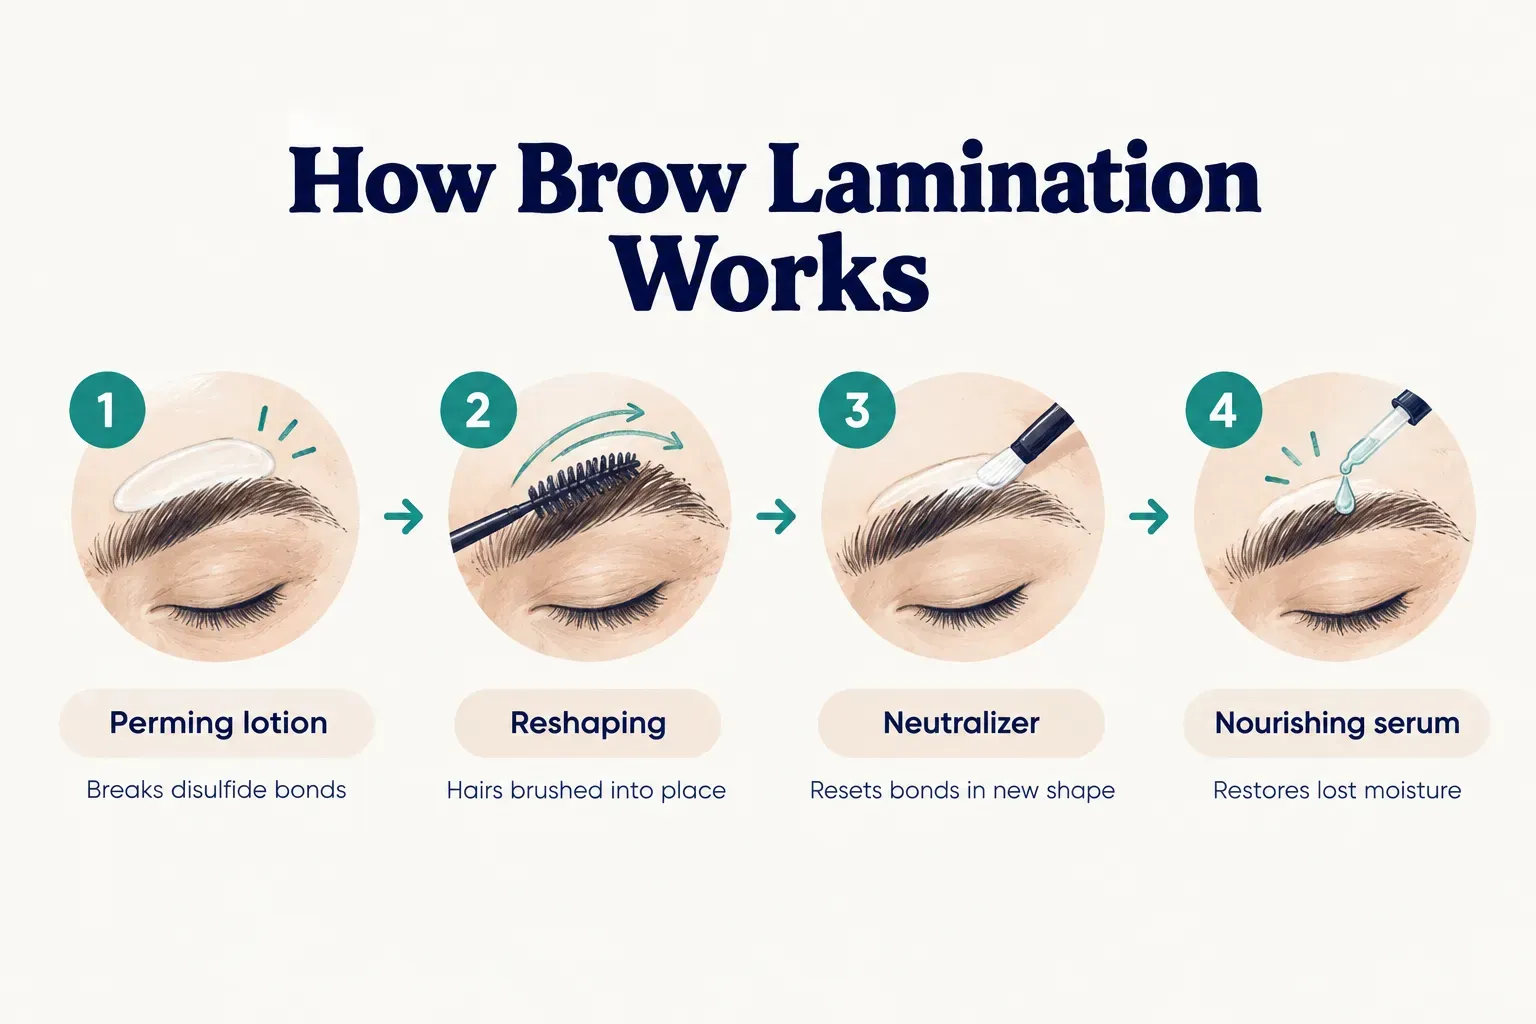
The shape of a hair strand is largely set by disulfide bonds, strong sulfur-to-sulfur links inside the keratin. A standard lamination follows three chemical stages, usually with a nourishing step at the end.
First, the technician applies a perming lotion, most often based on ammonium thioglycolate or a related form of thioglycolic acid. This softens the hair by breaking disulfide bonds.
Next, the hairs are brushed and pressed into the desired direction, often under plastic wrap to hold position during the processing time.
Then comes the neutralizer, typically an oxidizing agent such as hydrogen peroxide. It rebuilds the disulfide bonds in their new arrangement, setting the shape.
Finally, most systems finish with a conditioning serum or oil to replace some of the moisture the chemicals strip away.
Here’s the part many salons gloss over: results vary a lot by brow texture.
Coarse, curly, or stubborn downward-growing hairs may need longer processing to soften. Fine, porous, brittle, or previously overprocessed hairs absorb solution faster and can be damaged with the same timing.
Brow hair porosity matters most.
A porous hair is like a dry sponge, pulling in solution quickly and swelling more. A good technician adjusts timing for your hair rather than following a single number on the bottle.
Lamination vs tinting vs microblading
These three services are often bundled, but they do very different things.
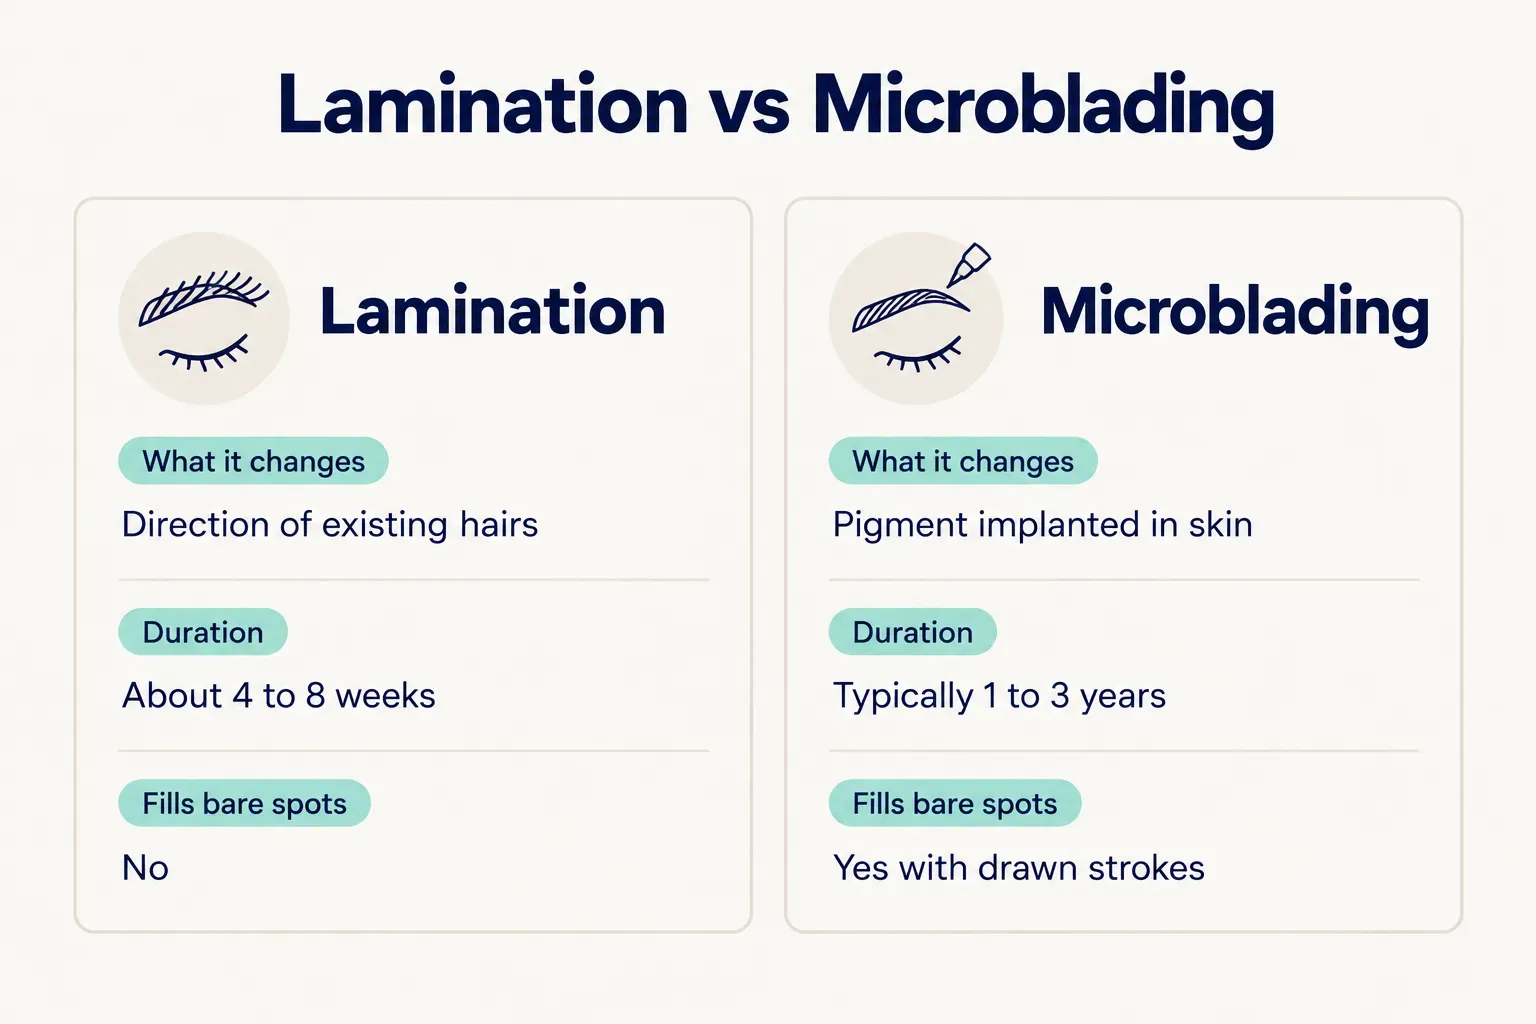
Brow tinting only adds color to existing hairs and skin using a dye. Lamination only changes the direction and shape of existing hairs.
Microblading deposits pigment into the skin with a fine blade to create hair-like strokes, and it’s semi-permanent, typically lasting one to three years.
Lamination and tinting are frequently combined in one appointment.
That’s convenient, but it stacks two chemical exposures on the same patch of skin within minutes. The perming step can leave the skin and hair cuticle more open, so the dye that follows may irritate more than it would on its own.
If you have sensitive skin, ask whether tinting can be done separately or skipped. Some technicians also note the U.S. FDA has not approved any color additive for permanently dyeing or tinting eyebrows, which is another reason to treat brow tints with caution.
As for duration, lamination typically lasts 4 to 8 weeks. The range depends on your brow hair growth cycle (new hairs grow in unlaminated) and how well you follow brow aftercare in the first couple of days.
Is brow lamination safe for you?
For most people with healthy skin, brow lamination is a low-risk treatment.
The trouble is that “most people” leaves out a sizable group, and the skin around your eyes is some of the thinnest on your body. Periocular skin reacts faster and more visibly than skin on your arm or scalp.
Who should avoid or delay it
Some conditions don’t rule you out forever.
They just turn a routine appointment into a gamble.
These are the main irritation multipliers to flag at your consultation:
- Active eczema, psoriasis, or rosacea on or near the brows. Inflamed skin absorbs chemicals more readily and reacts more strongly.
- Sunburned or compromised skin barrier. Peeling, raw, or freshly irritated skin has lost its protective layer.
- Recent retinoid or exfoliating acid use. Retinoids and chemical treatments don’t mix well, because retinol, tretinoin, AHAs and BHAs thin the outer skin layer over time.
- Recent waxing or threading in the brow area, which leaves micro-abrasions and open follicles.
Pregnancy and breastfeeding deserve an honest answer rather than a confident one.
There’s very little research specific to brow lamination during pregnancy, and formulas differ between brands, so one product’s safety profile doesn’t automatically apply to another. Hormonal shifts can also make skin more reactive and results less predictable.
The sensible move is to bring the product name and ingredient list to your doctor or midwife and get medical clearance. A blanket “yes, it’s fine” or “no, never” from a salon isn’t based on solid evidence either way.
Normal reaction or warning sign?
Some side effects are simply part of the process. Mild dryness, a slightly stiff or crunchy feel to the hairs, and faint redness that fades within a few hours are all expected after a chemical brow treatment.
Other symptoms are not normal and need attention:
- Burning or stinging that continues after the products are removed
- Blistering, weeping, or crusting skin, which can signal a chemical burn
- Swelling of the brow, eyelid, or forehead
- Severe or spreading redness, or intense itching
- Hair that snaps, frizzes, or falls out when brushed
- Eye pain, watering, blurred vision, or redness of the eye itself
Two different mechanisms can cause these problems.
Irritant contact dermatitis is direct chemical damage, usually from overprocessing or product left on too long, and it tends to appear quickly. Allergic contact dermatitis is an immune response to an ingredient, and it can appear much later.
Why a patch test isn’t a guarantee
A patch test involves applying a small amount of product, usually behind the ear or on the inner elbow, then waiting to see if the skin reacts.
It’s a smart step.
It’s also not a promise.
Allergic reactions are delayed by nature.
Your immune system can take 24 to 72 hours to respond, so a test checked after 15 minutes tells you very little. Even a clean 48-hour test doesn’t cover everything: the skin behind your ear is thicker than periocular skin, test amounts are tiny, and sensitization can develop with repeat exposure.

So treat a negative result as “lower risk,” not “no risk.” And keep watching your brows for three days after your appointment.
Preparing for and recovering from treatment
Most bad lamination outcomes trace back to two moments: the week before the appointment and the 48 hours after. Get those right and you remove a large share of the risk.
What to avoid beforehand
- Pause retinoids and acids. Stop retinol, prescription retinoids, and exfoliating acids around the brows for the period your provider recommends, often several days to a week. Prescription users should check with their prescriber.
- Skip hair removal for 48 hours. Avoid waxing, threading, or tweezing at least 48 hours before treatment. Your technician can handle brow mapping and shaping after lamination.
- Reschedule if your skin is flaring. If you’re sunburned, peeling, or in an eczema or rosacea flare, postpone. A short delay costs nothing compared with a chemical burn.
- Arrive with a clean face. Come without brow makeup, oils, or heavy creams so the products can work evenly on the hair.
Aftercare depends on your treatment
You’ll see “keep brows dry for 24 hours” in one guide and “48 hours” in another.
Both can be right.
The ideal window depends on the product system used, your processing time, the condition of your brows, and the specific provider’s instructions.
- Follow your provider’s window, not the internet’s. Your technician knows which formula and timing they used. Their aftercare sheet should beat any generic rule.
- Keep brows away from water, steam, and sweat. Skip saunas, hot showers aimed at your face, and intense workouts during the initial window. Moisture can loosen the set before it fully stabilizes.
- Hold off on brow makeup. Pencils, gels, and powders add friction and residue to freshly treated hair and skin.
- Apply the recommended oil or serum. After the dry period, use the nourishing product your provider suggests, usually once daily, to counter dryness and reduce hair breakage.
- Brush gently in the set direction. Use a clean spoolie and follow the shape. Don’t pick, rub, or brush hairs against the direction they’ve been set.
If something goes wrong
- Flush any product in the eye immediately. Rinse with clean, lukewarm water for at least 15 minutes, holding the eyelid open. Seek medical attention if pain, redness, or blurred vision persists.
- Contact your provider. If a reaction appears after you leave the salon, message or call them and ask exactly which products were used. You’ll need that information for any doctor.
- Document your symptoms. Take dated photos in good light and note when each symptom started. Delayed reactions can change quickly, and records help with diagnosis and any complaint.
- Get medical care for severe signs. Blistering, significant swelling, spreading rash, or any eye symptoms warrant a doctor, urgent care, or a dermatologist. Don’t wait it out at home.
Choosing a qualified brow professional
The product matters.
The person applying it matters more.
A skilled technician adjusts processing time, keeps solution away from your eyes, and spots red flags on your skin before anything touches it.
Use this checklist before you book:
- Valid license or certification. Requirements vary by region, but a licensed esthetician or cosmetologist with specific lamination training should be the baseline. Don’t hesitate to ask to see credentials.
- Visible sanitation practices. Look for fresh disposable applicators, clean or single-use brushes, hand washing or gloves, and a tidy workstation. Salon sanitation is a direct infection-control issue so close to the eyes.
- Clearly labeled products. The technician should tell you the brand and show you the ingredient list on request. Unlabeled bottles or decanted mystery solutions are a hard no.
- A real consultation. A careful provider asks about skin conditions, medications, retinoid use, pregnancy, and past reactions before booking. If nobody asks, nobody is screening.
- A clear patch-test policy. Ask when the test happens (ideally 24 to 48 hours before), where it’s applied, and how you should report results.
- An emergency response plan. Ask what they do if a client reacts during the service, and how to reach them afterward. An eyewash station or saline on hand is a good sign.
At-home lamination kits are cheap and widely available.
They also remove every safeguard above.
The main risks include:
- Incorrect timing. Without training, it’s easy to over-process fine or porous hairs, causing breakage and frizz.
- Product migrating toward the eyes. Working on your own brows in a mirror makes precise application genuinely hard.
- No professional skin assessment. Nobody checks for a compromised skin barrier or subtle irritation before you start.
- Weaker sanitation. Reused tools and opened bottles kept for months aren’t comparable to a trained technician’s setup.
Booking platforms can make vetting much easier. On Frendex, for example, you can:
- Review live provider profiles with photos of real brow work, so you can judge results on brows similar to yours.
- Check ratings from completed bookings only, which filters out reviews from people who never actually had the service.
- Message a technician before booking to ask about their patch-test policy, which product brand they use, and their experience with sensitive skin.
Deciding if it’s right for you
The decision comes down to three things: your skin, your expectations, and your provider. Get all three right and the odds are strongly in your favor.
If your skin is healthy, you understand lamination only restyles existing hair, and you’ve vetted a qualified technician, it’s a low-risk way to get a fuller look for a month or two.
Simple as that.
But if you have an active skin condition, aren’t sure about the ingredients, are pregnant or breastfeeding without medical clearance, or can’t verify how a provider works… wait.
A dermatologist can assess your skin and review the product list first.
Your best next step isn’t booking the full service.
It’s booking a consultation, in person or by chat. Ask about the product brand, patch-test timing, and aftercare instructions, and let the technician look at your skin.
If the answers are vague, keep looking.
Frequently asked questions
How long does brow lamination last?
Brow lamination typically lasts 4 to 8 weeks. The exact length depends on your brow hair growth cycle, since new hairs grow in without the set, and on how closely you follow aftercare in the first 24 to 48 hours.
What are the disadvantages of brow lamination?
The main disadvantages are chemical exposure near the eyes, temporary results, and possible dryness or irritation. It can't fill bare patches, and repeated treatments can weaken hairs. Combining it with tinting also raises the chance of irritation.
Can brow lamination ruin your brows?
Brow lamination can damage brows when it's overprocessed or repeated too often. Leaving solution on too long, especially on fine or porous hair, causes breakage, frizz, and a brittle texture. Leave at least 4 to 6 weeks between sessions to avoid cumulative damage, and longer if your hairs feel dry or snap easily.
Is brow lamination worth it?
Brow lamination is worth it for people with healthy skin who want a fuller, groomed look without daily styling. It's less worthwhile if you have very sparse brows, since it only works with existing hair. In that case, microblading or simply letting brows regrow may suit you better.
What should you not do after brow lamination?
You should not get your brows wet, steamed, or sweaty during the initial aftercare window, usually 24 to 48 hours depending on your provider. Avoid brow makeup, picking, rubbing, and brushing against the set direction. Also hold off on retinoids and exfoliating acids around the brows for a few days.
Does brow lamination damage your eyebrows?
Brow lamination causes mild, temporary stress to the hair when done correctly. Breaking and resetting disulfide bonds does dry the hair, which is why nourishing oils are part of aftercare. Real damage usually comes from long processing time, poor technique, or sessions spaced too closely together.
Need a hand with something?
The Frendex map shows you who is available near you, in real time.
Get the app free Get the app freeFree, no card needed
Related articles

Pest control cost in 2026: What you'll really pay
Real 2026 pricing for one-time visits, recurring plans, and termite or bed bug jobs. Learn what drives $95 vs $1,400 quotes before you sign.

Is your car asking for a wheel alignment?
Learn the real symptoms of bad alignment vs tire balance or wear issues. See what a technician checks and how to read your shop report before paying.

Boiler maintenance: A homeowner's safety and service guide
Learn which boiler checks are safe to DIY, which need a pro, and the warning signs that mean call for help now. A homeowner's framework for 2026.