Your 2026 playbook for home repair estimates
By Kiss János 13 min read

Why most repair estimates go wrong
The contractor said “about $1,200.”
The final invoice said $3,400.
Nobody lied, exactly. The scope was never written down, the material grade was never specified, and the rotted subfloor behind the vanity was never discussed until the wall came open.
That gap between a spoken number and a final bill is where most homeowners lose money. And it almost always traces back to the same root cause: an undefined scope of work.
If the job isn’t described in writing, the price isn’t really a price.
This guide gives you four tools to close that gap:
- A repeatable cost formula that accounts for every component of a home repair cost estimate.
- A sample itemized estimate you can model your own numbers on.
- A repair-scope worksheet framework for turning inspection findings into budget lines.
- A side-by-side checklist for comparing contractor bids fairly.
One caveat before the numbers start.
Every dollar figure here depends on your ZIP code, local labor rates, and 2026 material pricing, so treat them as planning benchmarks, not quotes. By the end, you’ll be able to build your own defensible estimate for home repairs before any contractor sets foot on your property.
Estimate, quote, or invoice?
Here’s what surprises most homeowners: an “estimate” is not a promise.
In most jurisdictions, a contractor can legally bill more than an estimate as long as the work was authorized. Understanding where your number sits in the pricing lifecycle tells you how much risk you’re carrying.
Preliminary budgets vs contractor bids
A repair price moves through five stages.
First comes the preliminary budget estimate, the rough number you build yourself or get over the phone. It’s typically accurate to within plus or minus 20-30%, which is fine for deciding whether a repair is a $500 problem or a $5,000 problem.
Next is the contractor estimate, based on a site visit. The contractor has measured, looked, and maybe tested, so accuracy improves.
But it’s still an estimate, and the homeowner usually absorbs overruns.
Then come the binding options: the fixed-price quote and the not-to-exceed price. Finally, the final invoice records what you actually owe, which should reconcile against the agreed price plus any approved change orders.
Fixed price vs not-to-exceed
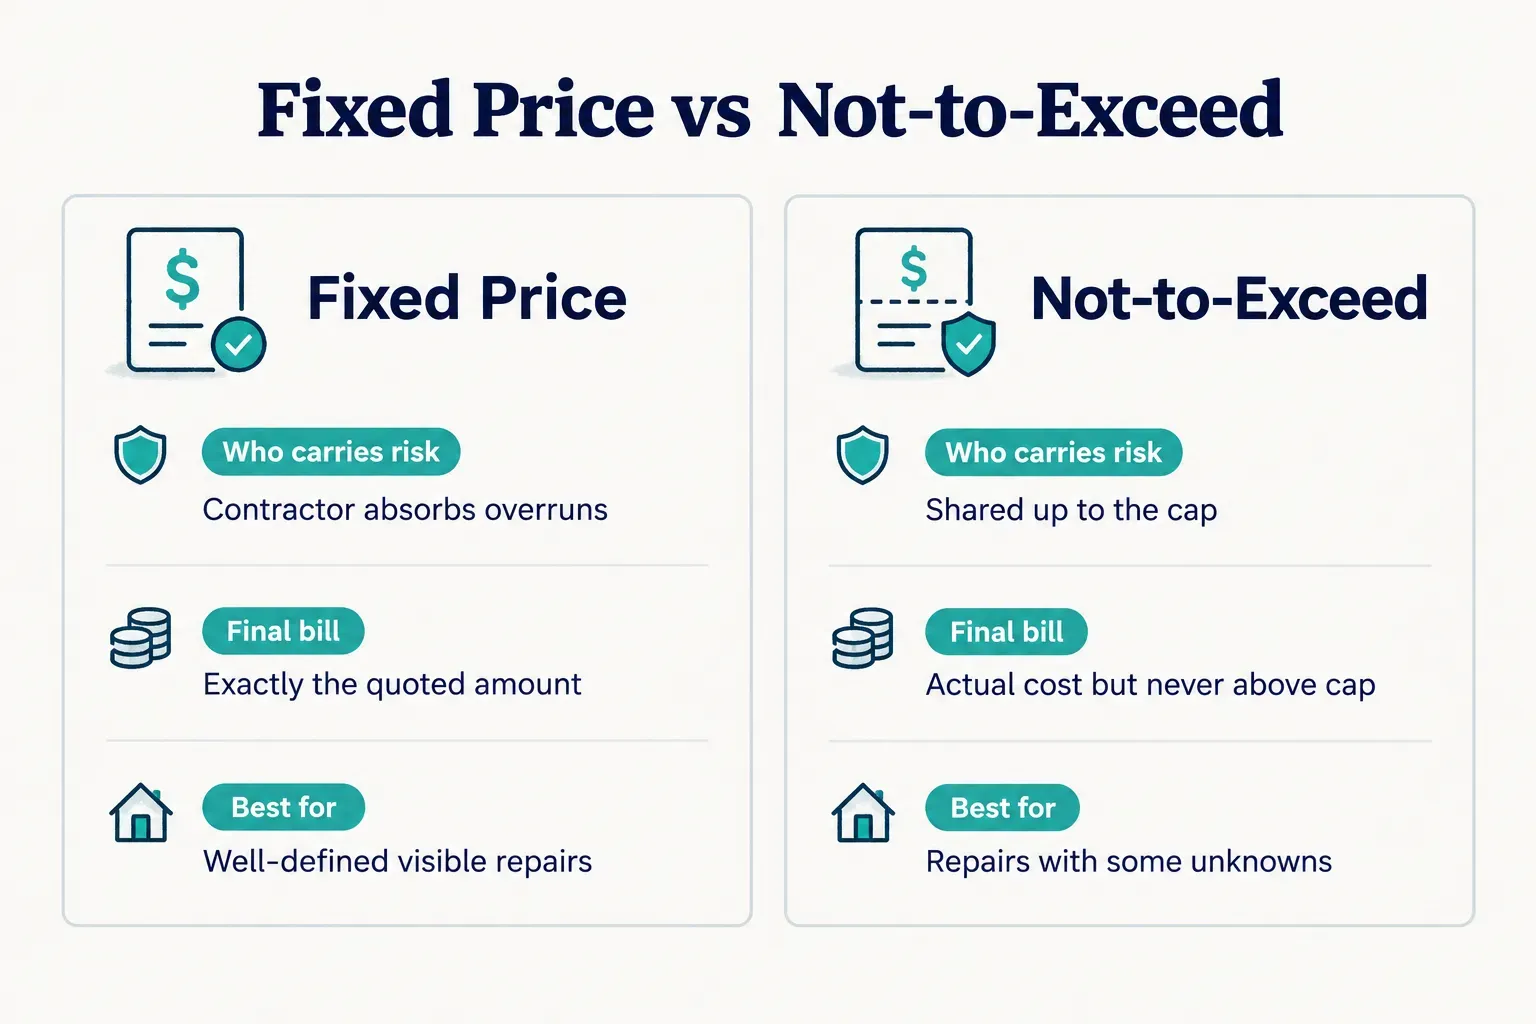
A fixed-price quote shifts the risk to the contractor.
If the job takes six hours instead of four, that’s their problem.
Contractors price this risk in, so fixed quotes often run slightly higher than estimates for the same work.
A not-to-exceed (NTE) price splits the difference.
You pay actual time and materials, but the total can’t pass a stated cap without your written approval. For repairs with some unknowns, an NTE clause is often the smartest structure, because it caps your exposure while rewarding efficient work.
A plain estimate has no cap at all.
That’s the key difference.
What a written estimate needs
Whatever the pricing structure, a written estimate should include at least these eight elements:
- Scope description: what’s being repaired, where, and to what standard.
- Quantities: square feet, linear feet, fixture counts.
- Material grade or brand: “moisture-resistant 1/2-inch drywall,” not “drywall.”
- Labor hours or flat rate for each task.
- Start and completion window.
- Exclusions: what’s explicitly not included.
- Validity period: often 30 days, since material prices move.
- Payment schedule: deposit, progress payments, and final payment terms.
One more thing.
A “free estimate” usually means it’s free to request a number, not that the number is guaranteed. Some contractors charge a diagnostic fee (commonly $75-$200 as of 2026) for detailed written quotes, especially for plumbing, electrical, and HVAC work, and many credit it back if you hire them.
The real cost formula
Most homeowners estimate repairs by adding labor and materials.
That misses roughly a third of the real cost.
A complete estimate for home repairs has ten components, and the ones people forget (disposal, overhead, contingency) are exactly the ones that create surprise bills.
The full formula looks like this:
Total = Labor (hours × rate) + Materials + Equipment Rental + Subcontractors + Permit and Inspection Fees + Disposal + Sales Tax + Overhead + Profit + Contingency
Ten cost components, explained
Each component has its own logic.
The table below breaks down what each one covers and how to calculate it for planning purposes.
| Component | What It Covers | How to Estimate (2026 Planning Range) |
|---|---|---|
| Labor | Time on site for each trade | Labor hours × hourly rate; roughly $60-$100/hr for general handyman work, $90-$150+/hr for licensed trades |
| Materials | Everything installed or consumed | Material takeoff (quantity) × unit cost, plus 10% waste for cut materials like drywall or tile |
| Equipment rental | Dehumidifiers, lifts, specialty tools | Daily rate × days; e.g., $40-$75/day for drying equipment |
| Subcontractors | Specialists hired by the general contractor | Sub’s own bid, often with a 10-15% GC markup |
| Permit and inspection fees | Municipal approvals for regulated work | Check your local building department; minor repair permits often run $50-$500 |
| Disposal | Debris hauling and dump fees | $50-$150 for a small load; $300-$700 for a dumpster |
| Sales tax | Tax on materials (and labor in some states) | Your local rate, typically 0-10%, applied to taxable items |
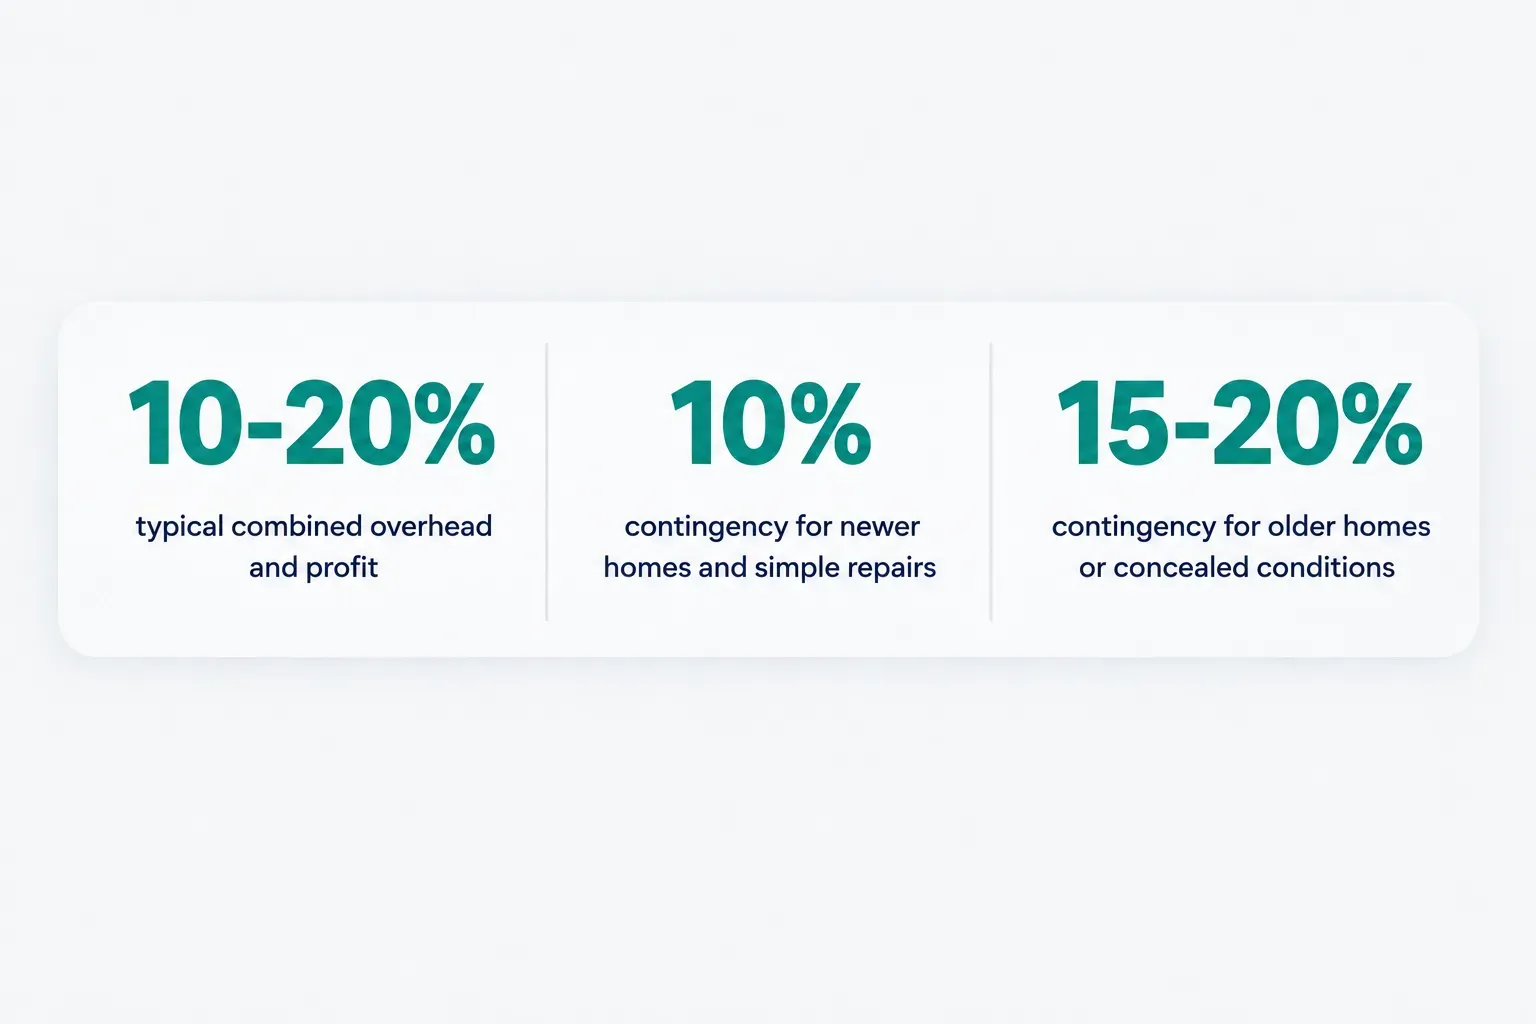
| Overhead | Insurance, vehicles, licensing, office costs | Combined with profit, typically 10-20% of job cost |
| Profit margin | The contractor’s return for running a business | Included in the 10-20% combined figure above |
| Contingency reserve | Unknowns and hidden damage | 10% for newer homes and simple repairs; 15-20% for older homes or concealed conditions |
Two of these deserve a closer look. Contractor overhead and profit margin often get mistaken for padding.
They aren’t.
A contractor carrying liability insurance, workers’ comp, a licensed vehicle, and proper tools has real costs that don’t appear as line items, and a bid with no margin is either an error or a business that won’t be around to honor its warranty.
The contingency reserve is your buffer, not the contractor’s.
Use 10% for a newer home or a visible, straightforward repair. Bump it to 15-20% for homes built before about 1980, for anything behind walls or under floors, and for any issue an inspector flagged.
A sample line-item estimate
Here’s what a fully itemized estimate looks like for a common job: a leaking shower valve that has stained the ceiling below.
Assumptions: licensed plumber at $120/hr, general repair labor at $80/hr, 7% sales tax on materials, and a 1970s home (so a 15% contingency).
| Item | Quantity | Unit Cost (Materials) | Labor Hours | Subtotal |
|---|---|---|---|---|
| Leak diagnosis and access (plumber) | 1 visit | $0 | 1.5 @ $120 | $180 |
| Replace shower valve cartridge and supply fittings | 1 set | $85 | 2.0 @ $120 | $325 |
| Remove wet ceiling drywall | 32 sq ft | $0 | 2.0 @ $80 | $160 |
| Dehumidifier and air mover rental | 3 days | $55/day | 0 | $165 |
| Antimicrobial surface treatment | 1 gallon | $40 | 0.5 @ $80 | $80 |
| Moisture-resistant drywall, tape, mud, screws | 2 sheets | $80 total | 6.0 @ $80 | $560 |
| Prime and paint ceiling | ~60 sq ft | $60 | 3.0 @ $80 | $300 |
| Debris disposal | 1 small load | $75 | 0 | $75 |
| Plumbing permit (if required locally) | 1 | $95 | 0 | $95 |
| Direct cost subtotal | 17.0 hrs | $1,940 | ||
| Sales tax (7% on $265 materials) | $19 | |||
| Overhead and profit (15%) | $294 | |||
| Contingency (15% of direct costs) | $291 | |||
| Estimated total | $2,544 |
Exclusions: tile removal or replacement, mold remediation beyond surface treatment, upgraded fixtures, and repair of any framing damage.
Assumptions: the valve body itself is intact, no asbestos in ceiling texture, and work is during standard business hours.
Change-order terms: any additional work requires written homeowner approval before it begins, priced at the same unit rates shown above.
Notice what that footnote does.
It tells you exactly where the price could move, and how.
Scoping the repair before you call
The single biggest budgeting error after a home inspection?
Counting one problem twice.
A finding like “moisture staining near flashing” often gets budgeted as a roof repair and a drywall repair, inflating the total and confusing every contractor who reads your list.
Reading an inspection report
Inspection reports describe symptoms, not repairs.
Your job is to trace each symptom to its source and budget one line per root cause. That moisture stain becomes a single scope item: “Reseal or replace step flashing at chimney; repair and repaint stained ceiling below, approx. 4 sq ft.”
Think of it like a doctor’s chart. A fever and a cough might be one infection, not two diseases.
Group related findings by location and cause before you assign any dollars.
For each grouped item, your worksheet should capture five things: the finding as written, the probable cause, the proposed repair, quantities, and the trade needed.
That’s your scope of work, and it’s what you’ll hand to every bidder later.
Priority: Safety first, cosmetics last
Not every repair deserves money this year.
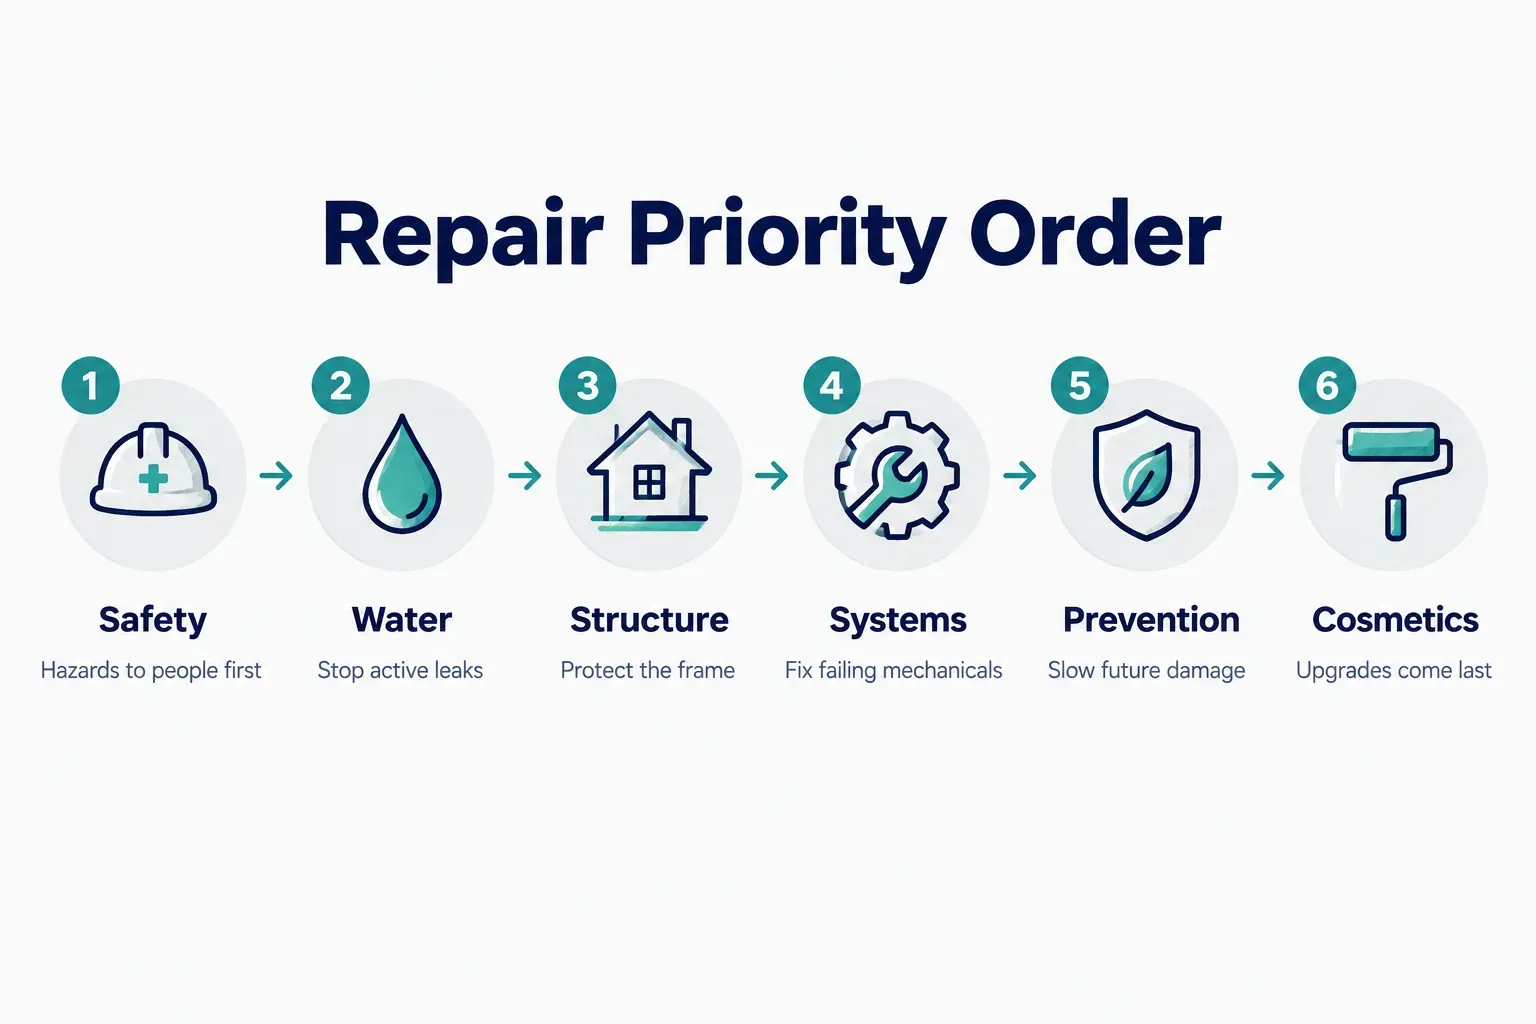
When the list is longer than the budget, sequence repairs in this order:
- Health and safety hazards: gas leaks, exposed wiring, missing smoke or CO detectors, broken stair railings.
- Active water intrusion: roof leaks, plumbing leaks, foundation seepage. Water damage compounds weekly.
- Structural issues: foundation movement, compromised framing, failing beams.
- System failures: electrical, plumbing, and HVAC components at or past end of life.
- Preventive maintenance: gutter repair, caulking, grading, sealing.
- Cosmetic upgrades: paint, flooring, fixtures that work but look dated.
A $400 flashing repair now beats a $6,000 ceiling and insulation job next spring.
Every time.
Documenting hidden damage
Self-estimating has limits.
Stop and call a specialist for structural cracks (especially horizontal or stair-step cracks wider than 1/4 inch), knob-and-tube wiring, suspected mold, sagging rooflines or floors, and any item an inspector marks “recommend further evaluation.”
Those words mean the inspector couldn’t price it, and neither can you.
Even with good scoping, hidden damage shows up once walls open.
When it does, document it before anyone keeps working. Ask for timestamped photos of the condition, measurements of the affected area, and a written explanation of why it wasn’t visible earlier.
Then require a written change order with the added scope, cost, and schedule impact.
No signature, no extra billing.
That one rule prevents most invoice disputes.
Comparing estimates like a pro
Three bids are only useful if they describe the same job.
Too often, homeowners describe a problem verbally to three contractors and get back three different projects, each priced differently.
That isn’t a comparison.
It’s noise.
Same scope, real comparison
The fix is simple: write the scope once and send the identical document to every bidder. Your scope sheet should specify the following.
- Exact location and dimensions of the work, so nobody guesses at square footage or linear feet.
- Material specifications or brand/model where you have a preference, so bids reflect the same quality level.
- Material allowances stated as dollar figures (e.g., “$250 fixture allowance”) when you haven’t chosen products yet.
- A request for itemized pricing, with labor hours and unit costs broken out, not a single lump sum.
- Known conditions and photos from your inspection report, so every contractor starts with the same information.
Watch allowances closely.
A low bid with a $150 faucet allowance looks great until you pick a $400 faucet, and suddenly the “cheapest” bid isn’t. Compare allowances line by line, and normalize them to the same figure before comparing totals.
Beyond price: What else matters
Price is one data point.
These factors often matter more for the final outcome:
- License and insurance verification: check the license number with your state board and ask for a certificate of insurance naming you as certificate holder.
- References: ask for two or three recent jobs similar to yours, ideally within the last 12 months.
- Workmanship warranty length: one year is common; two to five years signals confidence, and it should be in writing.
- Diagnostic method: a contractor who used a moisture meter or camera inspection is pricing evidence, while one who glanced and guessed is pricing hope.
- Proposed schedule: a realistic start date and duration beat a vague “next couple weeks.”
- Communication responsiveness: how quickly and clearly they answered during bidding predicts how they’ll communicate mid-project.
Then confirm, in writing, who pays for the extras that cause friction later:
- Permit and inspection fees: usually the contractor pulls permits, but the cost may be billed through to you.
- Debris removal: included in some bids, a separate line in others.
- Temporary protection: floor coverings, plastic sheeting, and dust barriers.
- Parking and travel time: relevant in dense cities or for providers coming from far away.
- Emergency or after-hours service calls: often billed at 1.5x to 2x standard rates.
Keeping records in one place
Scattered texts, emails, and voicemails are where scope agreements go to die. When a dispute comes up, you need to find the exact photo, message, or approval in seconds.
App-based workflows solve this well. With a platform like Frendex, for example, the process looks like this:
- Photograph the issue and attach it to a written description of the repair.
- Send the same scope to several nearby providers, so every bid answers the identical question.
- Compare provider profiles and prices side by side, including reviews and service details.
- Approve change orders in chat, creating a timestamped record of what you agreed to and when.
- Keep every message, photo, and confirmation together for warranty claims, insurance, or resale documentation.
Whatever tool you use, the principle holds.
One scope, one thread, one record.
Get one estimate that actually holds
If you take one action from this guide, make it this: write the scope yourself before you approve any repair.
Use the worksheet framework (finding, cause, repair, quantities, trade), and require the contractor’s response in writing with exclusions and a change-order clause.
That single document does more to protect your budget than any amount of haggling.
And follow one firm decision rule.
If the job involves safety, structure, or concealed conditions, pay for a specialist diagnosis before pricing the repair, not after.
A $150 diagnostic fee is cheap insurance against a $5,000 guess.
Here’s the shift worth making.
The goal was never the cheapest number… it’s the most accurate and best-documented one.
Cheap estimates create surprise bills.
Accurate, itemized, written estimates are what actually keep the final invoice close to the first number you saw.
Frequently asked questions
How do I calculate an estimate for home repairs?
Calculate a home repair estimate by adding labor (hours × rate), materials, equipment rental, subcontractors, permit and inspection fees, disposal, sales tax, overhead, profit, and a contingency reserve. Start with a written scope that lists quantities and material grades, then price each line separately. Add 10% contingency for simple repairs on newer homes and 15-20% for older homes or concealed conditions.
What should a written home repair estimate include?
A written home repair estimate should include a scope description, quantities, material grade or brand, labor hours or flat rates, a start and completion window, exclusions, a validity period, and a payment schedule. It should also state how change orders are approved and priced. If any of these elements is missing, ask for it before signing.
How much should I set aside for home repairs each year?
Most homeowners should set aside 1-4% of their home's value each year for repairs and maintenance. Use the low end for newer homes in good condition and the high end for homes over 30 years old or with deferred maintenance. On a $400,000 home, that's $4,000 to $16,000 annually, adjusted for age and inspection findings.
How many quotes should I get for home repairs?
Get three quotes for most home repairs, and four or more for major structural or system work like foundations, roofs, or full electrical upgrades. Send every contractor the identical written scope so the bids are directly comparable. Three bids against three different scopes tell you almost nothing.
What is the difference between an estimate and a quote for home improvement?
An estimate is an approximate price that can change, while a quote is a fixed price the contractor commits to for a defined scope. With an estimate, the homeowner typically absorbs cost overruns. A not-to-exceed price sits between the two, billing actual costs up to a written cap.
How can I compare contractor estimates?
Compare contractor estimates by giving every bidder the same written scope, then reviewing itemized line items rather than totals. Normalize material allowances to the same dollar figure, confirm who pays for permits, disposal, and protection, and check each contractor's license, insurance, references, and workmanship warranty. The best bid is the most complete and clearly documented one, not automatically the lowest.
Need a hand with something?
The Frendex map shows you who is available near you, in real time.
Get the app free Get the app freeFree, no card needed
Related articles

The contractor contract: A complete guide for 2026
See exactly what a contractor contract must cover in 2026, from scope to payment terms. Avoid the disputes that start over vague wording.

How to spot fake reviews before you get fooled
Learn the real patterns behind fake reviews: language clues, timing red flags, and reviewer history checks. No single signal is proof, here's what is.

Quote vs estimate: Which do you actually need?
Quotes vs estimates explained in plain terms, plus the document checklist that actually protects your money. See when you can skip the paperwork entirely.