Toilet repair: A symptom-first troubleshooting guide
By Kiss János Updated 17 min read
Your toilet is acting up, now what?
Most people fix the wrong part first.
A toilet runs, someone searches online, and twenty minutes later there’s a new flapper on the tank while the real culprit (a misadjusted float, a cracked overflow tube, or a supply line leak) keeps doing its damage.
Effective toilet repair starts with the symptom, not the part.
Is the water running constantly, or does the tank refill on its own every hour? Is the floor wet at the base, or is moisture dripping from the tank above?
Each answer points to a different cause, and each cause has a different fix.
This guide uses a decision-tree approach. You match what you see, hear, or smell to the most likely cause, run one quick check to confirm it, and only then buy parts or call someone.
It’s faster.
It’s cheaper.
And it keeps you from replacing three components to solve one problem.
Toilet type matters too. A standard gravity-fed toilet uses a flapper and fill valve, while dual-flush models often use a canister-style flush valve instead. Pressure-assisted toilets rely on a sealed tank inside the ceramic shell, and commercial-style flushometer units have no tank at all. The core logic below applies to all of them, but parts and procedures differ, and we’ll flag those differences where they come up.
Ahead: running toilets, weak flushes, clogs, leaks at the tank and base, and a clear line between what you can safely handle yourself and what belongs with a licensed plumber.
Start with a symptom check
Here’s a counterintuitive truth: the loudest toilet problems are often the cheapest to fix, while the quietest ones (a slow seep, a faint odor) can signal the most expensive damage.
A symptom check sorts these out before you spend a dollar.
Matching symptoms to root causes
Use the table below as your first stop. Find the symptom that best matches what you’re experiencing, note the likely causes, and perform the first check listed.
The final column flags whether the problem may extend beyond the toilet itself.
| Symptom | Most Likely Cause(s) | First Check to Perform | Could It Be Beyond the Toilet? |
|---|---|---|---|
| Running continuously | Float set too high, fill valve not shutting off, or flapper not sealing | Lift the lid and see whether water is spilling into the overflow tube | Rarely; almost always a tank component |
| Phantom flushing (tank refills on its own) | Worn, warped, or debris-covered flapper; corroded flush valve seat | Run a dye test and check the bowl after 15 to 30 minutes | No; this is a tank-to-bowl seal failure |
| Slow tank filling | Partially closed shutoff valve, debris in fill valve, kinked supply line | Open the toilet shutoff valve fully and inspect the supply line | Possibly, if other fixtures also show low pressure |
| Weak flush | Water level too low, clogged rim jets or siphon jet, short flapper chain | Confirm water sits about 1 inch below the top of the overflow tube | Possibly, if a partial drain blockage sits downstream |
| Full clog (water rises, won’t drain) | Paper or foreign object lodged in the trap | Stop flushing, then use a flange plunger | Yes, if other drains back up at the same time |
| Gurgling or bubbling | Drain vent blockage or partial branch-line clog | Run the sink or tub nearby and watch the toilet bowl | Yes; this usually points to venting or the sewer line |
| Sewage odor | Failed wax ring seal, dry trap in unused fixture, vent problem | Check for rocking at the base and smell near the floor line | Yes, especially if odor appears in multiple rooms |
| Tank leak (water on outside of tank) | Loose or corroded tank bolts, failed tank-to-bowl gasket, condensation | Dry the tank and watch whether water beads on the surface or drips from bolts | No |
| Base leak (water on floor) | Wax ring failure, loose supply nut, condensation, cracked bowl, damaged flange | Dry everything, flush, and watch where moisture reappears first | Rarely, but floor damage may extend below |
Pay close attention to the right-hand column.
Gurgling, bubbling in other fixtures, or multiple slow drains almost never mean the toilet itself is defective. Those symptoms point to a drain vent blockage, a clogged branch line, or a developing sewer problem.
No amount of flapper swapping will touch them.
The base-leak row deserves a second look as well. Many homeowners assume any floor water means a failed wax ring, but condensation from a cold tank on a humid day, a loose supply connection, or a hairline crack in the bowl can all produce identical puddles.
The table separates these on purpose.
Rule out the simple causes before you pull a toilet off the floor.
A wet floor tells you water escaped. It doesn’t tell you where it came from. Always trace the source before assuming the seal failed.
Fixing running, weak, or clogged flushes
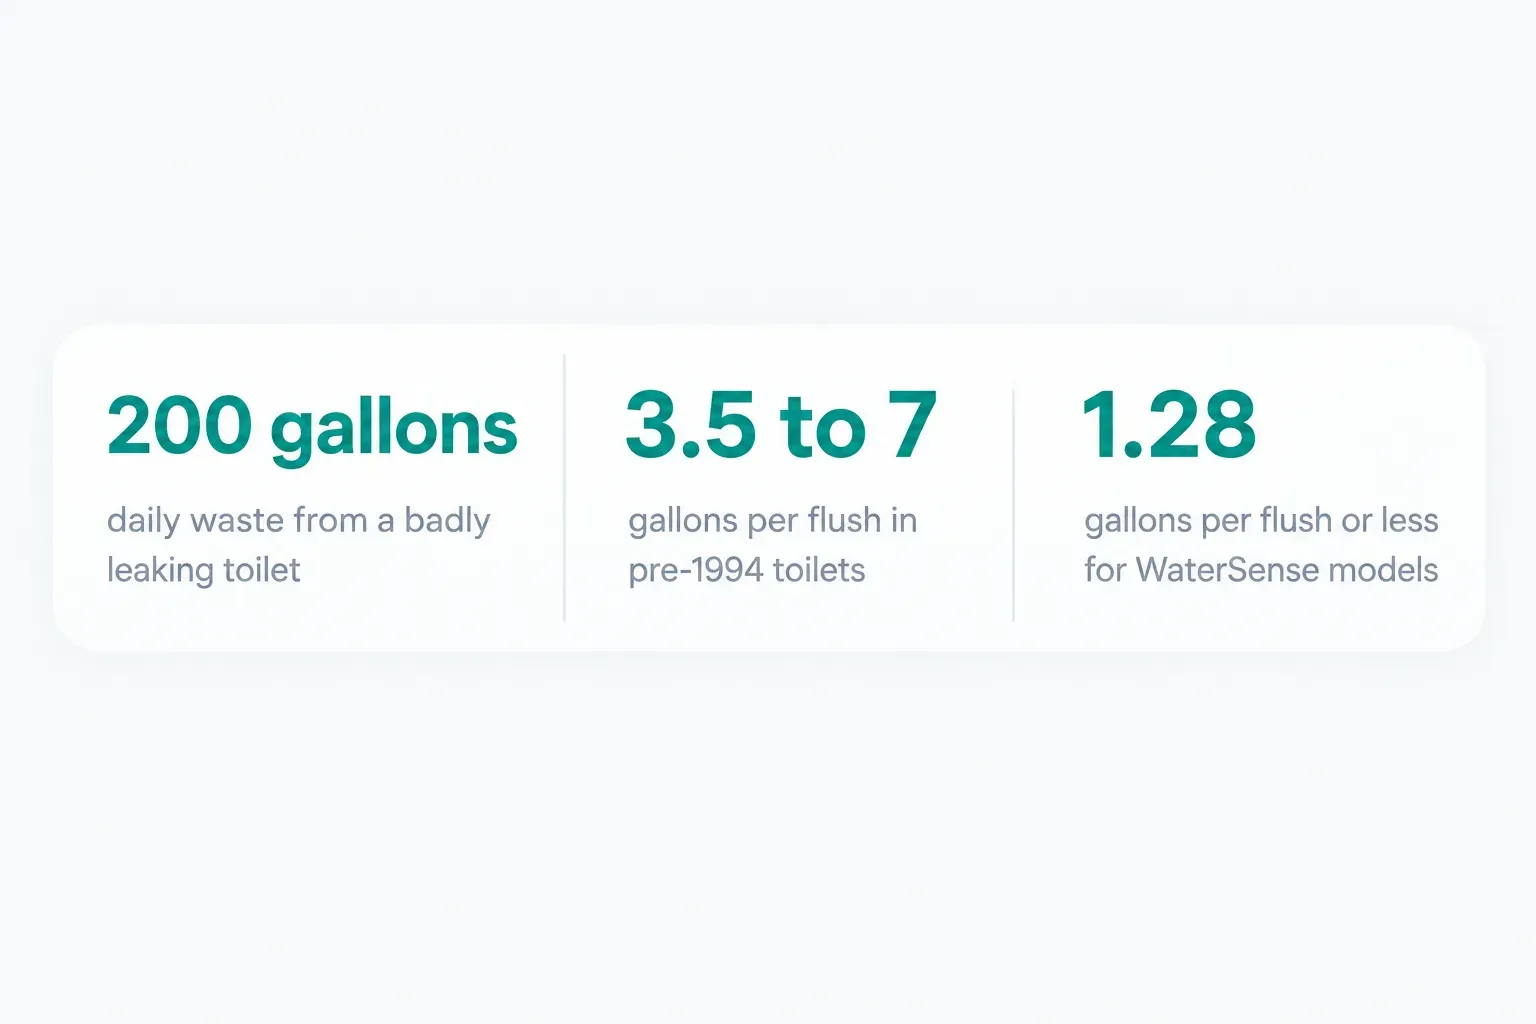
According to the EPA, a toilet with a badly leaking flapper can waste 200 gallons of water per day.
That’s the equivalent of running a garden hose for over an hour, every day, through a component that costs less than a sandwich.
Running and weak flushes are where most DIY toilet repair succeeds, so this is the section to get right.
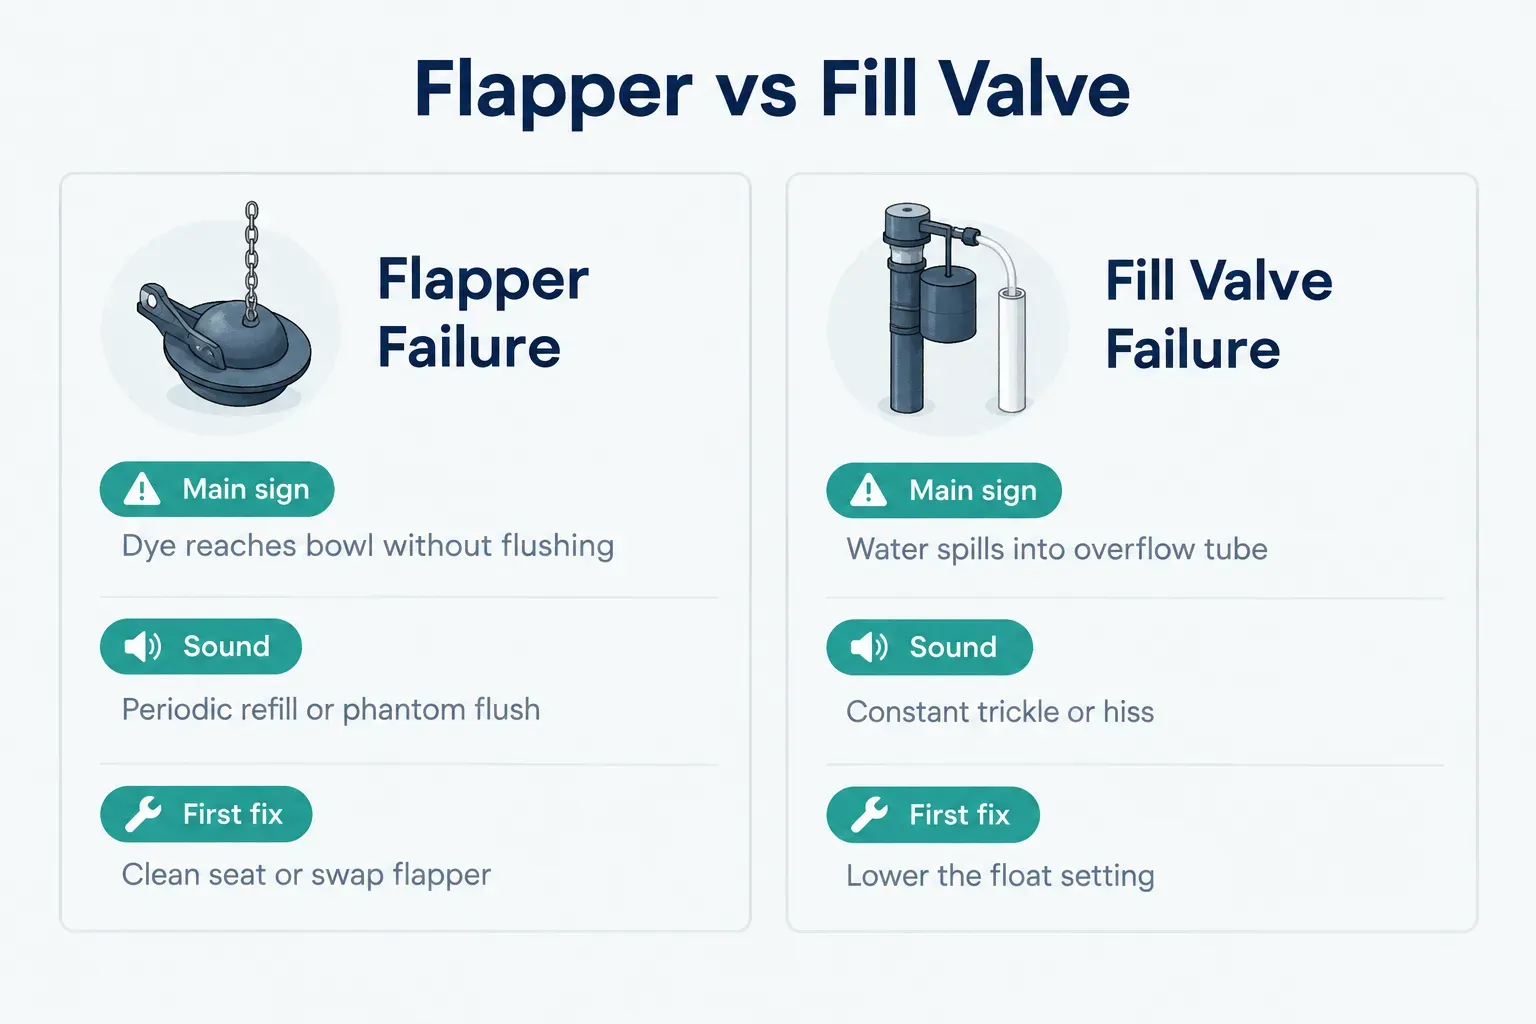
Flapper vs fill valve: Which one failed?
Two tank components cause nearly all running toilets: the flapper valve (the rubber seal at the bottom of the tank) and the fill valve (the tower on the left that refills the tank).
Here’s how to tell them apart and replace the faulty one.
- Run the food coloring test. Add 10 to 15 drops of food coloring to the tank water and don’t flush. If color appears in the bowl within 15 to 30 minutes, the flapper is leaking water from the tank into the bowl.
- Check the overflow tube. With the lid off, watch and listen. If water is trickling into the open top of the overflow tube, the fill valve isn’t shutting off, usually because the float is set too high or the valve itself is worn.
- Try a toilet float adjustment first. On modern float-cup valves, squeeze the clip or turn the adjustment screw to lower the float about half an inch. The water line should settle roughly 1 inch below the top of the overflow tube.
- Shut off the supply. If an adjustment doesn’t solve it, turn the toilet shutoff valve clockwise until it stops. Old multi-turn valves can seize or leak when turned, so go gently.
- Flush to drain the tank. Hold the handle down to empty as much water as possible, then sponge out what remains. A dry tank makes part removal far easier.
- Detach the old part. For a flapper, unhook the chain and slide the ears off the pegs on the overflow tube. For a fill valve, disconnect the supply line under the tank and unscrew the locknut holding the valve in place.
- Match the replacement to your toilet. Check the brand and model number (usually stamped inside the tank behind the water line) and confirm the flush valve size, typically 2 inches or 3 inches. A universal flapper on a brand-specific toilet often seals poorly and wastes water.
- Install and test the fill level. Reconnect everything, open the shutoff valve, and let the tank fill. Set the chain with about half an inch of slack, then run the dye test again to confirm the seal.
Dual-flush toilets work a bit differently.
Most use a canister flush valve with a large rubber seal at the base rather than a hinged flapper. The same dye test applies, but you’ll replace the canister seal instead of a flapper.
Clearing a clog without damage
Plunging seems obvious.
But most people use the wrong plunger and the wrong motion, then escalate to force or chemicals that cause real damage.
Follow this sequence instead.
- Stop flushing immediately. If the bowl is rising, lift the tank lid and push the flapper closed with your hand. Another flush on a clogged toilet is how bathroom floors flood.
- Use a flange plunger, not a cup plunger. A flange plunger has a rubber sleeve that extends from the bottom of the cup and fits into the toilet outlet. Flat cup plungers are designed for sinks and can’t seal the curved bowl.
- Seal the outlet completely. Insert the flange into the drain opening and make sure water covers the cup. You’re pushing water, not air, so the seal is what generates pressure.
- Use a steady push-pull motion. Start with a gentle push to expel air, then work 15 to 20 firm strokes, pulling back as hard as you push. The pull often does more than the push, because it loosens the clog rather than packing it tighter.
- Switch to a closet auger after three or four rounds. If plunging hasn’t worked, stop. Pushing harder can crack the bowl or blow out the wax seal, so feed a closet auger into the trap, crank it clockwise, and retract slowly to pull the obstruction free.
- Skip chemical drain cleaners entirely. Caustic cleaners generate heat that can crack porcelain, degrade the wax ring seal, and kill the bacteria septic systems depend on. They also sit in the bowl if they fail, creating a hazard for whoever plunges or augers next.
- Call for a professional snake if the auger fails. A standard closet auger reaches about 3 to 6 feet. Clogs beyond that, or toilets that clog again within days, point to a drain line or sewer issue that needs powered equipment.
One more tip: if your flush feels weak even when nothing’s clogged, mineral buildup in the rim jets is a common culprit. Use a small mirror to inspect the holes under the rim, then clear them with a bent wire or a stiff brush after soaking with white vinegar.
Tracking down a leak
The most expensive toilet leaks make no sound at all.
A silent toilet leak can drain thousands of gallons a year without a single audible hiss, showing up only as a creeping water bill or, worse, a stain on the ceiling below.
The dye test and what timing tells you
The dye test is the simplest diagnostic tool in toilet repair, and it costs essentially nothing. Remove the tank lid, add a dye tablet or 10 to 15 drops of dark food coloring, and replace the lid.
Don’t flush.
Now check the bowl at three intervals: 10 minutes, 30 minutes, and 60 minutes. The timing tells you how serious the leak is.
If color shows up within the first 10 minutes, you’re looking at a significant gap between the flapper and the flush valve seat. That usually means a warped flapper, a chain caught underneath it, or a cracked seat.
If color appears only at the 30 or 60 minute mark, the seal is wearing out gradually, often from chlorine exposure or mineral deposits.
Both outcomes mean water is escaping.
A slow seep may waste “only” a few gallons a day, but that adds up to over 1,000 gallons a year from a single toilet.
And because the fill valve tops off the tank so slowly, you won’t hear a thing.
Water usage monitoring helps here too. Turn off every fixture in the house and check your water meter.
If the low-flow indicator (often a small triangle or dial) is still spinning, something is leaking, and the toilet is the first place to look.
Why the base is wet (it isn’t always the wax ring)
Water at the base triggers an instant assumption: the wax ring has failed.
Sometimes that’s true.
But several other causes produce the same puddle, and most of them are far easier to fix.
Condensation is the classic impostor.
In humid months, cold supply water chills the tank, and moisture from the air beads on the outside and drips to the floor. The giveaway is a uniform film of droplets across the tank surface, not a concentrated drip from one spot.
A loose supply line nut is the next suspect.
The toilet supply line connects to both the shutoff valve and the fill valve shank, and either connection can weep slowly. Run a dry paper towel around both points and look for dampness.
Other causes include loose or corroded tank bolts, a hairline crack in the bowl or tank (sometimes invisible until the area is completely dry), a warped or failing wax or rubber seal, and a damaged toilet flange underneath. The flange anchors the toilet to the drain pipe, and if it’s cracked or sitting below floor level, no seal will hold for long.
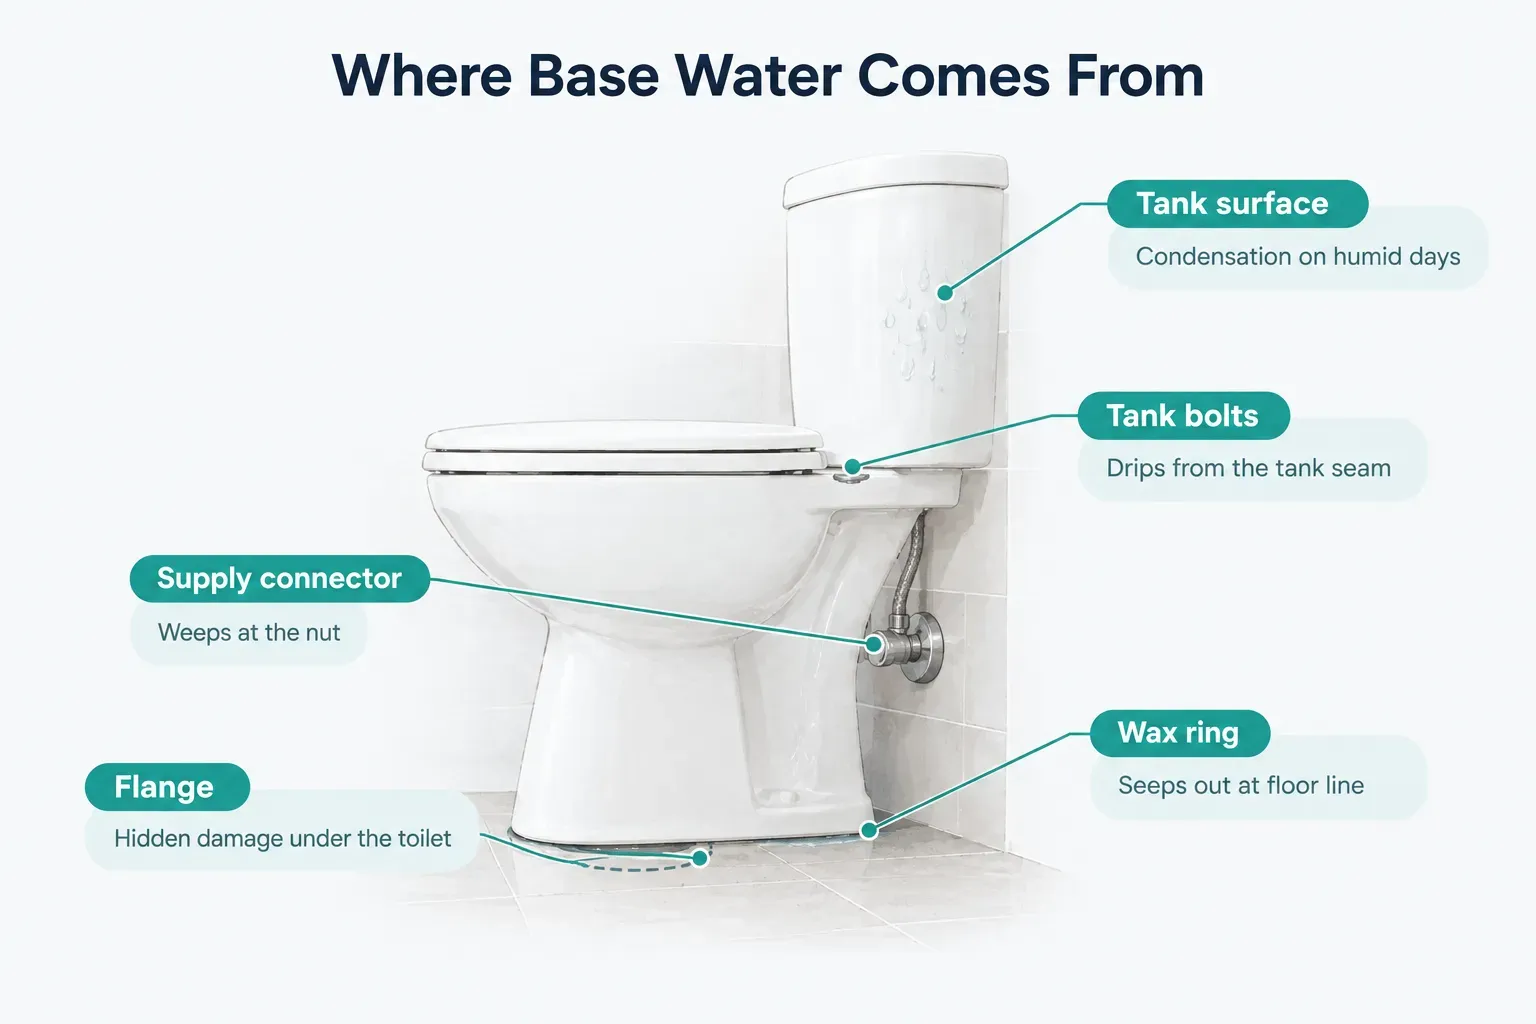
To narrow the source, start with a completely dry toilet. Wipe down the tank, bolts, supply line, and floor with towels.
Then place dry paper towels or tissue around the base and under each connection.
Next, let the tank refill, flush once, and watch closely.
Where does moisture appear first?
A drip from the tank bolts will run down the bowl. A supply leak wets the connector and the floor directly beneath it.
Water that seeps out from under the base itself, especially right after a flush, is the strongest sign of a failed seal.
That distinction matters, because it determines how big the job is.
Tank bolts, supply nuts, and fill valves are tank-only repairs.
You can handle them without moving the toilet.
Wax or rubber seal replacement, flange repair, an unstable floor connection, or any visible subfloor damage all require pulling the toilet off the floor entirely, which is a much heavier lift (literally, since a standard toilet weighs 60 to 120 pounds).
DIY limits: What to fix, what to hand off
Confidence is great.
Overconfidence floods bathrooms.
Knowing where your skills end is the most important part of toilet repair safety, and it’s the part most guides skip.
Tasks you can safely handle
These jobs require basic tools (an adjustable wrench, a sponge, maybe a screwdriver) and carry minimal risk if you shut off the water first. Most take 10 to 30 minutes.
- Flapper swap: Replacing a worn flapper is the most common DIY toilet fix. Match the size and brand, set the chain slack correctly, and confirm with a dye test.
- Fill valve replacement: Universal fill valves fit most gravity toilets and come with clear instructions. Set the water level to the line marked inside the tank or about 1 inch below the overflow tube.
- Supply nut tightening: A quarter turn with a wrench often stops a weeping connection. Overtightening plastic nuts can crack them, so snug is the goal, not maximum torque.
- Tank bolt adjustment: Tighten tank bolts alternately, a little at a time, until the tank sits firm. Cranking one side can crack the porcelain, which turns a free fix into a replacement.
- Plunging: With a flange plunger and proper technique, most household clogs clear in a few minutes.
- Closet auger use: An auger handles clogs that plunging can’t reach. Use one with a protective sleeve to avoid scratching the bowl.
Signs to shut off water and call a pro now
Some symptoms mean the problem has moved past the tank and into the structure of your home or the drain system. If you see any of these, close the shutoff valve, flush to empty the tank, and contact a licensed plumber.
- Water pooling that returns after drying: If you’ve tightened the supply nut and ruled out condensation, recurring water at the base means the seal or flange has failed, and every flush pushes more water into the subfloor.
- Soft or spongy flooring around the base: This is a sign of long-term water damage. The subfloor may be rotting, and continued use risks the toilet breaking through or the flange tearing loose.
- Sewage odor with gurgling in other drains: This combination points to a drain vent blockage or a developing sewer line problem. A sewage backup can follow, carrying real health risks.
- A cracked bowl or tank: Cracks rarely stay small. A tank crack can split under water pressure and release several gallons at once.
- A toilet that rocks after tightening the base bolts: Persistent rocking means the flange is broken, the floor is uneven, or the subfloor has weakened. Each wobble also breaks the wax seal a little more.
Renters and tenants should document everything before attempting any repair.
Many leases restrict tenant repairs, and documentation protects you if damage spreads.
Use this repair verification checklist:
- Timestamped photos of the toilet, the floor around it, and any visible water or staining.
- A short video capturing the leak, the running sound, or the gurgling as it happens.
- A list of affected fixtures, noting whether sinks, tubs, or other toilets show symptoms too.
- Visible ceiling or floor damage, including any stains on the ceiling of the room below.
- Written notification to your landlord or property manager by email or through the tenant portal, so there’s a dated record.
Repair, replace, or request help
At some point, repairing an old toilet stops making sense. Toilets over 15 to 20 years old often have discontinued parts, brittle tank components, and flush mechanisms that use far more water than modern standards allow.
Toilets made before 1994 commonly use 3.5 to 7 gallons per flush.
Current federal standards cap new toilets at 1.6 gallons, and a WaterSense toilet uses 1.28 gallons or less while still meeting performance testing.
If your water bill keeps climbing from a chronically running toilet, replacement may pay for itself within a few years.
- Repair when the toilet is structurally sound, parts are available, and the problem is limited to tank components.
- Replace when the bowl or tank is cracked, the toilet predates 1994, or you’ve replaced multiple components within a year without solving the underlying issue.
- Request help when the job involves removing the toilet, touching the flange, or addressing anything below the floor line.
When a job does need a licensed plumber, the quality of your request shapes the quality of the quote.
As of 2026, platforms like Frendex let homeowners submit the toilet type, the symptom, urgency, prior repair attempts, photos, and access constraints (such as a second-floor bathroom or limited parking) in one request.
A provider can then quote accurately before arriving, which cuts down on surprise charges and wasted trips.
One fix at a time
Here’s your one task for tonight: run the dye test and check the flapper before you replace anything.
Most running-toilet problems turn out to be a 10-minute part swap that costs less than $15.
Keep the decision simple.
If the fix lives inside the tank, proceed with DIY. If it involves pulling the toilet, touching the flange, or anything under the floor, document the issue with photos and video and request a licensed professional.
Small toilet problems rarely stay small.
A quiet seep becomes a higher water bill, and a slow base leak becomes a rotted subfloor… usually right when you least expect it. Make preventive bathroom maintenance a habit, fix what you find promptly, and keep a record of every repair.
Frequently asked questions
How do I fix a toilet that keeps running?
Most running toilets are fixed by lowering the float or replacing the flapper. Check whether water spills into the overflow tube (a fill valve or float issue) or leaks into the bowl during a dye test (a flapper issue). The step-by-step process is covered in the "Flapper vs Fill Valve" section above.
What is the most common toilet problem?
A running toilet caused by a worn flapper is the most common toilet problem. Flappers typically last 4 to 5 years before chlorine and minerals degrade the rubber. Clogs are a close second.
How do I know if my toilet flapper is bad?
A flapper is bad if it fails the dye test within a few minutes or shows visible warping, cracking, or discoloration. Other signs include phantom flushing, where the tank refills on its own, and a flapper that feels stiff or slimy to the touch. Replace it with a model matched to your toilet's brand and flush valve size.
Why is my toilet leaking at the base?
A toilet leaks at the base because of a failed wax ring, a loose supply nut, condensation, loose tank bolts, a cracked bowl, or a damaged flange. Dry the area, flush, and watch where water appears first. The "Why the Base Is Wet" section walks through each cause.
Can I fix a toilet myself?
Yes, you can fix most tank-related toilet problems yourself. Flapper swaps, fill valve replacements, supply nut tightening, plunging, and auger use are all safe DIY tasks. Jobs that require removing the toilet or repairing the flange are better left to a professional.
When should I call a plumber for a toilet?
Call a plumber when you see structural flooring issues, repeated clogs after plunging and augering, or any sewer-line symptom. That includes soft flooring, recurring base leaks, gurgling in multiple drains, or sewer gas odor. These problems extend beyond the toilet and can cause serious damage if ignored.
Need a hand with something?
The Frendex map shows you who is available near you, in real time.
Get the app free Get the app freeFree, no card needed
Related articles

Pest control cost in 2026: What you'll really pay
Real 2026 pricing for one-time visits, recurring plans, and termite or bed bug jobs. Learn what drives $95 vs $1,400 quotes before you sign.
Boiler maintenance: A homeowner's safety and service guide
Learn which boiler checks are safe to DIY, which need a pro, and the warning signs that mean call for help now. A homeowner's framework for 2026.
Rodent control: A homeowner's step-by-step guide
Skip the trap-and-hope cycle. This 8-step IPM method shows why sealing entry points matters more than traps. See the full sequence inside.