Washing machine not working? A homeowner's guide
By Kiss János 16 min read
Before you panic: What’s really wrong
Your washer stops mid-cycle, full of gray water, and your first thought is the cost of a new one.
Hold that thought.
Most “dead” washers aren’t dead at all.
The vast majority of failures trace back to five root causes: power, water supply, drainage, settings, or load balance. A tripped breaker, a half-closed valve, a sock in the drain path, or a towel bunched on one side of the drum can all make a perfectly healthy machine look broken.
This guide uses a symptom-first approach to washer troubleshooting. You start with what you can see and hear, isolate the cause, and only then think about parts.
Guessing at parts is how people spend $90 on a drain pump when the real problem was a kinked hose.
There’s also a firm boundary here.
You’ll get safe visual and mechanical checks that any homeowner can do, and clear signals for when the job belongs to a licensed repair technician.
Live wiring, motors, and sealed components are not weekend projects.
One note for renters and landlords.
If the fault turns out to be in the home’s plumbing (a clogged standpipe or a backed-up drain line) rather than the appliance itself, you may need to involve a property manager or plumber instead of an appliance specialist.
Safety first: Checks to run immediately
Water and electricity share the same small space behind your washer.
That’s why the first five minutes matter more than any diagnosis.
Good appliance repair safety starts before you touch anything.
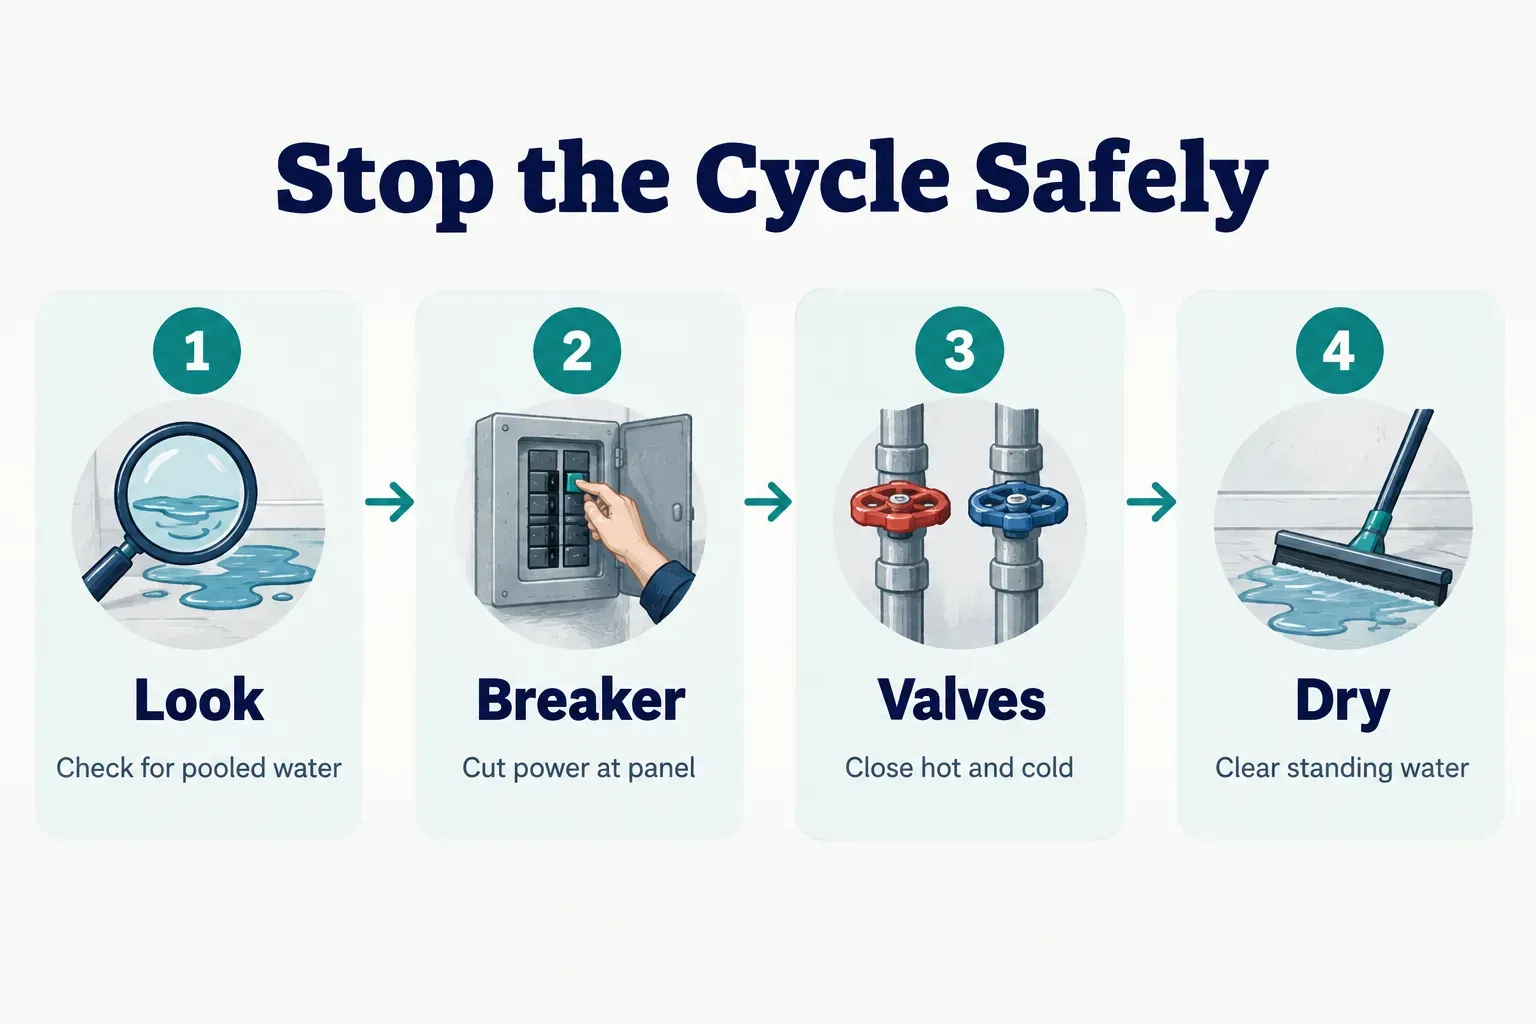
Stop the cycle safely
- Look before you touch. Scan the floor around the machine and the wall outlet for pooled water. If water is anywhere near the plug or outlet, do not reach for the plug or the control panel.
- Cut power at the breaker. Go to your electrical panel and switch off the circuit that feeds the washer. This is the only safe way to de-energize a machine sitting in water.
- Close both supply valves. Turn the hot and cold valves behind the washer clockwise until they stop. This halts a leak at the source, so you can investigate without the floor flooding further.
- Soak up standing water. Use towels or a wet vac to clear the area before you pull the machine out or open any panels.
Quick checks anyone can do
Once the area is dry and safe, run through these. They take about ten minutes and solve a surprising share of service calls before anyone has to show up.
- Verify the outlet and breaker. Plug a lamp into the same outlet to confirm it’s live, and check whether a GFCI outlet nearby has tripped. A washer with no lights at all is usually a power problem, not a machine problem.
- Confirm both water valves are fully open. A valve that’s only a quarter open can cause slow fills, long cycles, or fill error codes. Turn each one fully counterclockwise.
- Check the door or lid latch. Press the door firmly until it clicks, or close the lid fully. Most washers will not fill, agitate, or spin unless the lid switch or door lock assembly reports a secure close.
- Rule out settings. Look for an active delay-start timer, a paused cycle, child lock, or a cycle like “rinse only” or “no spin.” These look exactly like mechanical failures from across the room.
- Check your detergent. Too much detergent, or regular detergent in a high-efficiency machine, creates excess suds. Many washers detect the foam and pause draining or skip the spin, which mimics a pump failure. Use only HE detergent in HE machines, and follow the dose line on the cap.
Diagnose the problem by symptom
Here’s where most people go wrong.
They describe a problem as “it won’t drain” when the machine actually drains fine and simply refuses to spin.
Those are different faults with different fixes, so precision pays off.
Work through the symptom that matches what you’re seeing. Start at the top of each list, since the most common and cheapest causes come first.
Washer won’t drain or spin
Drain problems come in three flavors, and they are not interchangeable. Pin down which one you have before doing anything else.
- Won’t drain at all. Water sits in the drum after the cycle ends. The likely causes are a clogged pump filter, a kinked or blocked drain hose, an object jammed in the drain pump, or a failed pump.
- Drains slowly. Water eventually leaves, but the cycle drags on or throws a drain error. This usually points to a partial clog in the filter, hose, or the household standpipe, or a drain hose pushed too far down the pipe.
- Drains fine but won’t spin. The drum empties, then nothing happens, or it spins weakly and stops. This is rarely a drain fault and rarely the motor.
For the no-spin case, check the non-motor causes first. They account for far more no-spin calls than motors do.
- Unbalanced load. A single heavy item like a bath mat or comforter can stop the spin entirely. Modern washers sense imbalance and refuse to spin up rather than shake themselves apart, so redistribute the load and try again.
- Lid or door lock not engaging. If the lock can’t confirm it’s closed, the control board blocks the spin as a safety measure. A worn latch or broken striker is a common culprit.
- Wrong cycle selection. Delicate, hand-wash, and wool cycles use very low spin speeds, and some have a “no spin” option that’s easy to bump.
- Clogged drain path. Many washers won’t enter spin until the water level sensor confirms the tub is empty. A slow drain can quietly prevent the spin from ever starting.
- Belt or coupling failure. Only after ruling out the above should you suspect a worn drive belt or a broken motor coupling. Both are technician-level repairs on most models.
A quick word on filters.
You’ll see “just clean the filter” advice everywhere, but many top-load machines and some newer designs have no user-accessible lint or pump filter at all.
Check your owner’s manual before you start removing panels looking for something that doesn’t exist.
Leaking from the bottom or door
Water on the floor tells you something went wrong.
It doesn’t tell you where.
Good leak detection means working from the outside in, with the power off, checking each potential source in order.
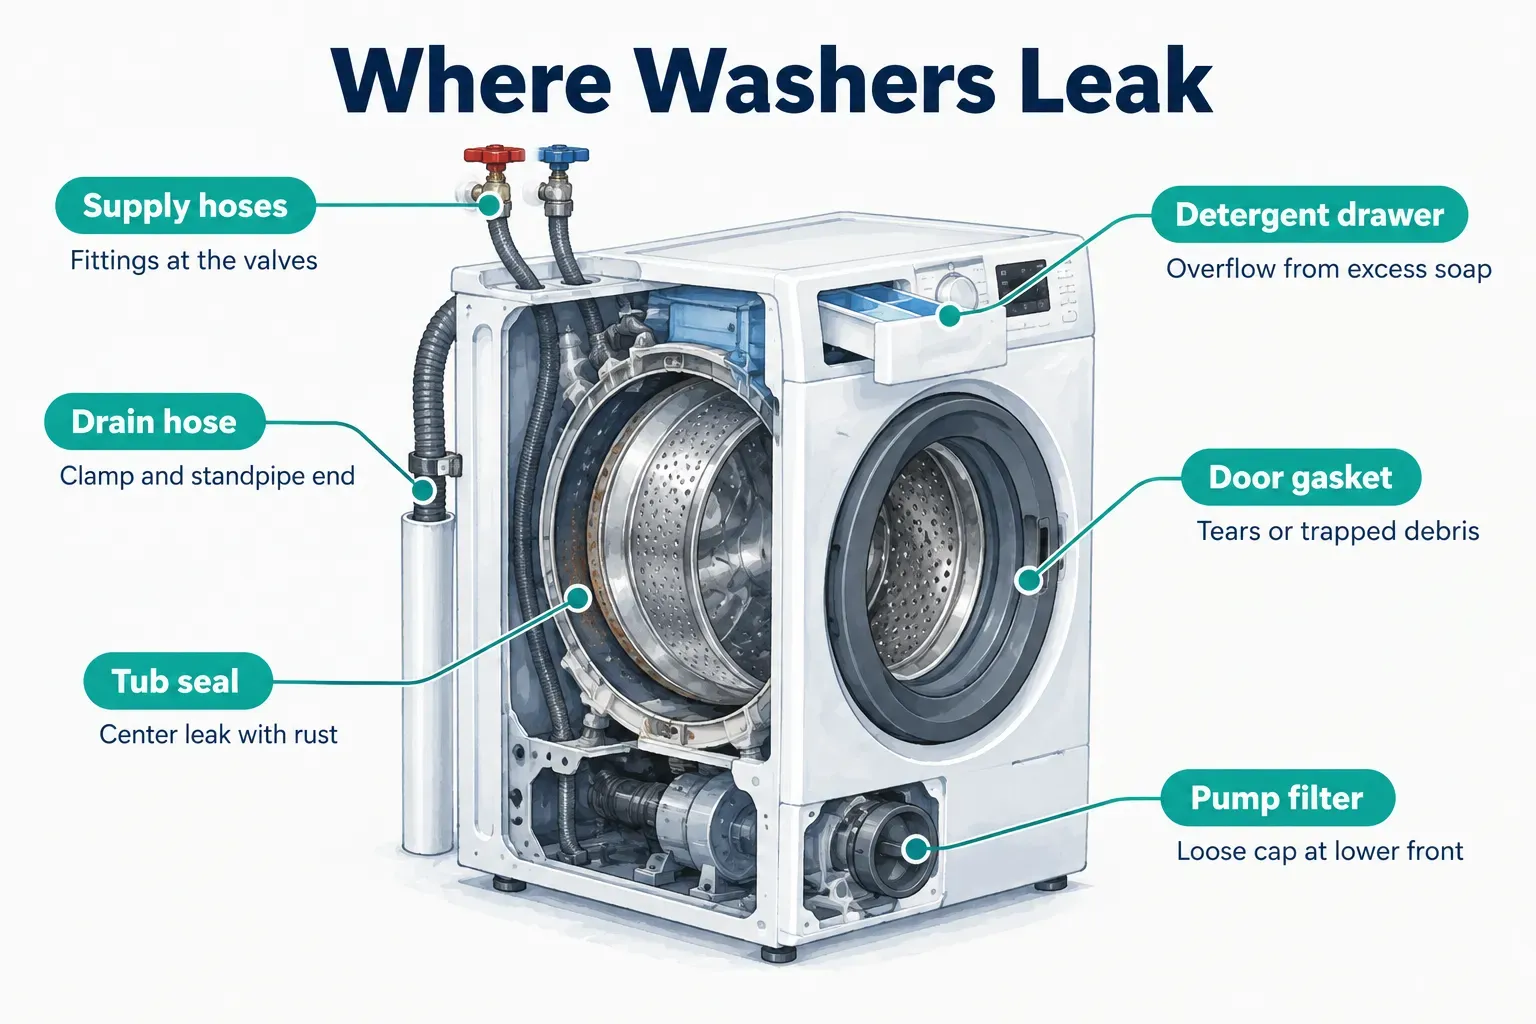
- Supply hose fittings. Run a dry paper towel around the hot and cold connections at the valves and at the back of the washer. Loose fittings, worn rubber washers, and bulging hoses are the most common leak source and the easiest to fix.
- Drain hose connection. Check where the hose clamps onto the washer and where it enters the standpipe. A cracked hose or loose clamp often leaks only during the drain stage, which makes it easy to miss.
- Detergent drawer overflow. Excess detergent or a clogged dispenser can push water out the front of the drawer. Look for residue and drip marks below it.
- Door gasket. On front-loaders, inspect the rubber door gasket for tears, trapped debris, or a fold that breaks the seal. Even a hairpin caught in the folds can cause a steady drip during washing.
- Pump filter housing. If you’ve recently cleaned the filter, the cap may be cross-threaded or not fully tightened. This leaks from the lower front corner.
- Tub seal. Water appearing directly beneath the center of the machine, often with rust streaks, can mean a failed tub seal. That usually comes paired with bearing damage and requires a technician.
- Household standpipe backing up. If water appears behind the machine only when it drains, the standpipe itself may be overflowing. That’s a plumbing issue, covered in the next section.
Loud noises or violent shaking
Your washer is telling you exactly what’s wrong.
You just have to learn the vocabulary.
Each sound maps to a different cause.
- Rhythmic banging during spin. This is almost always an unbalanced load or poor washer leveling. Redistribute the clothes, then check that all four feet sit firmly on the floor using a level on top of the machine. Worn suspension rods or shock absorbers cause the same symptom when proper load balancing doesn’t help.
- Grinding or roaring that gets louder with speed. This classic sound points to worn tub bearings. It often starts as a low rumble and grows over weeks, and it typically means a major repair.
- Loud hum with no movement. A humming pump that moves no water usually means the pump impeller is jammed by a sock, coin, or hair tie. The motor is getting power but can’t turn.
- Rattling or clinking. Coins, keys, bra underwires, and buttons find their way between the drum and tub or into the pump. Power off, then check the drum holes, the gasket folds, and the pump filter if your model has one.
Fills up but won’t start
This one confuses people.
The water comes in, so the machine clearly has power… but then nothing happens.
Several causes can produce this.
- Locked door sensor. The door may be closed but the lock may not be engaging electronically. Many machines fill before they confirm the lock, then stop and wait.
- Test or demo mode. Some washers ship with a showroom demo mode, or get bumped into a diagnostic mode by an accidental button combination. Your manual lists the sequence to exit.
- Stuck start button. A sticky or worn button may register as constantly pressed, which some control boards interpret as a fault and refuse to run.
- Control board fault. A failing control board can open the water inlet valve but never send the signal to agitate or spin.
A power-cycle reset often fixes the first three. If the washer still stalls after a reset, or stalls again within a cycle or two, the problem is likely the lock assembly or the board, and that’s a job for a professional.
Washer fault or plumbing problem?
Not every washer problem is a washer problem.
Sometimes the machine is doing its job perfectly, and the house simply can’t take the water.
Figuring out which side of the wall the fault lives on saves you from calling the wrong professional.
Here’s a simple home test.
Run a drain-only or spin-only cycle and watch what happens nearby.
If water backs up into a utility sink, a floor drain, or bubbles out of the standpipe behind the washer, the household drain line is the bottleneck, not the machine.
A washer can pump out water at a fast rate, and an older or partially clogged drain line can’t always keep up.
That’s why a standpipe overflow often shows up as a “leak” behind the machine.
If you see this, a plumber or your property manager is the right call, and no amount of appliance repair will fix it.
Top-load versus front-load differences
The design of your machine changes how hard every fix is. A five-minute job on one washer can be a two-hour, two-person job on another.
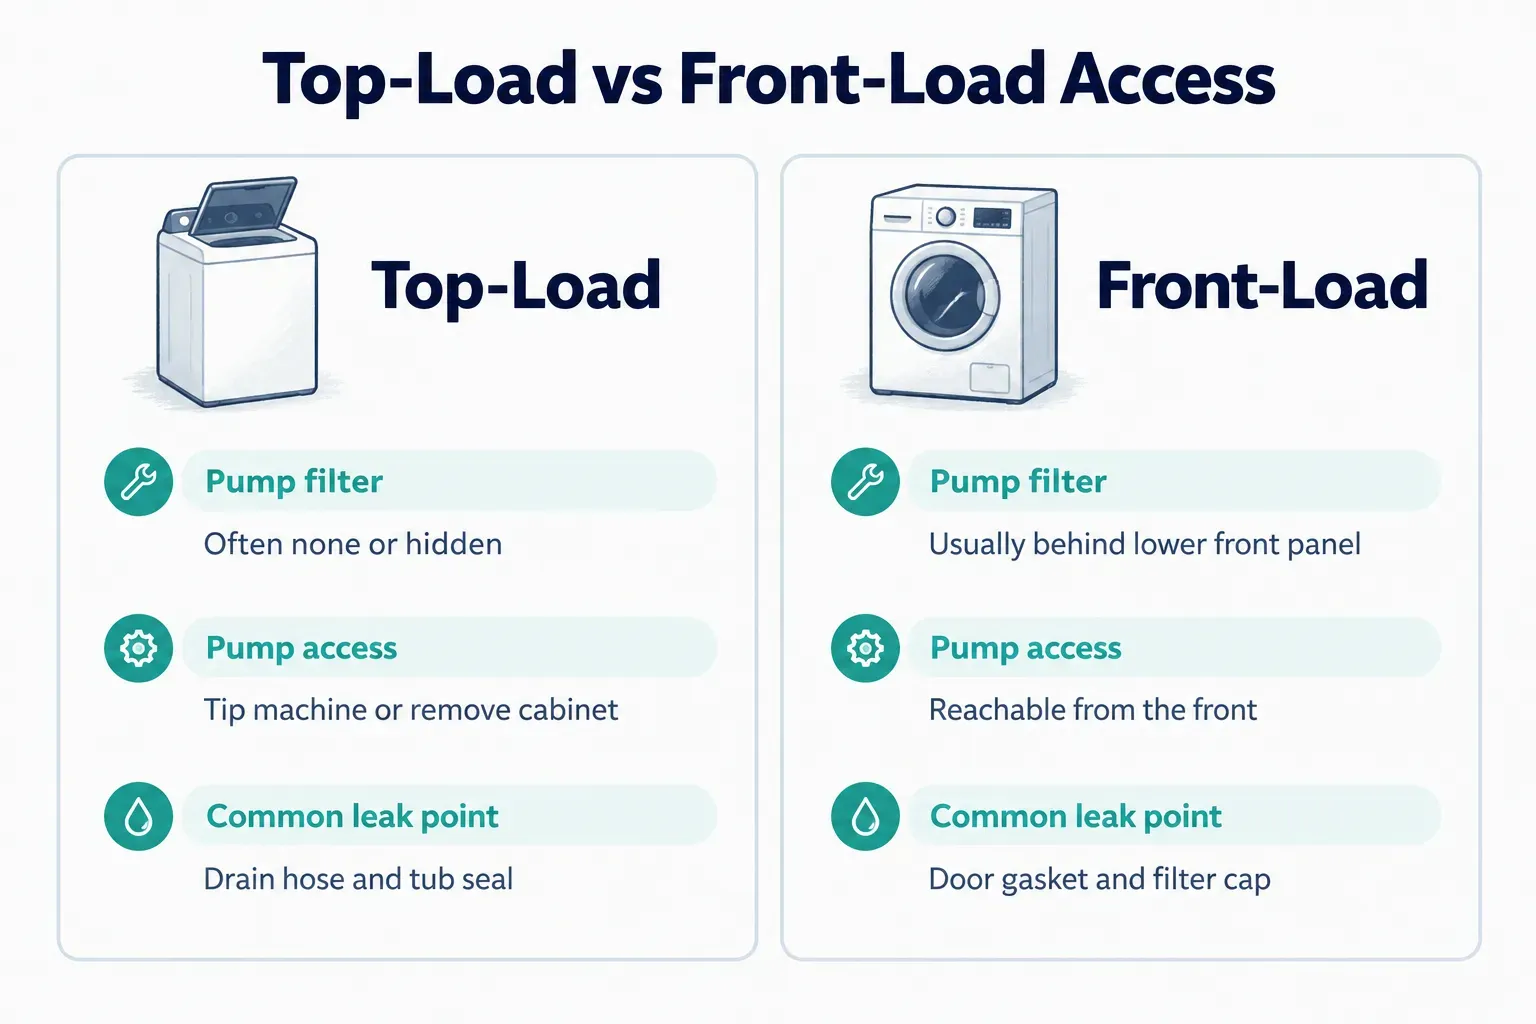
On most front-load washers, the pump filter sits behind a small panel at the lower front corner. You can reach it with a towel and a shallow pan, which makes clearing a clog genuinely DIY-friendly.
On most top-load washers, the pump sits underneath or behind the cabinet, and reaching it often means tipping the machine or removing the cabinet entirely.
Then there are stacked units and washers squeezed into closets or alcoves.
These limit access entirely.
An apparently simple filter or hose job becomes unsafe when you have to pull a 150-pound machine out of a tight space, often with a dryer stacked above it.
If you can’t reach the back of the machine without straining, or the unit is stacked, treat even “simple” jobs as technician work.
Tipping injuries and crushed hoses cause more damage than the original fault.
Reading your model number and error codes
Your model number is the key to every accurate diagnosis. It’s printed on a plate or sticker, usually on the door frame (front-loaders), under the lid or on the back edge of the control console (top-loaders), or on the rear panel.
Why does it matter so much?
Because error codes are not standardized across brands.
The same code can mean entirely different things depending on the manufacturer.
For example, “F21” has historically indicated a long drain time on some Whirlpool front-loaders but a motor or drum rotation fault on some Bosch models.
Generic online code lists can send you chasing the wrong part.
Your owner’s manual, or the manufacturer’s support page for your exact model, is the authority.
As of 2026, most major brands post full error code tables online, and several let you scan a QR code on the machine to pull up model-specific troubleshooting.
DIY fix or call a professional
The internet is full of washer repair videos that make everything look easy.
Some of it is.
Some of it ends in a shock, a flooded floor, or a $300 repair turning into an $800 one.
What’s safe to check yourself
A handful of tasks are genuinely safe for a careful homeowner. Clearing an accessible pump or lint filter is first on the list, as long as your manual shows a user-serviceable filter and you drain the residual water into a pan first.
Checking hoses is next.
Look for kinks behind the machine, blockages at the drain hose end, and worn or bulging supply hoses.
You can also remove small objects from the drum, gasket, and filter, but only after cutting power completely.
Finally, a power-cycle reset is always safe.
But understand what it actually does.
A reset only clears a temporary control-board glitch, such as a frozen cycle after a power flicker.
If the fault returns immediately after a reset, the reset didn’t fix anything. It just confirmed that a real mechanical or electrical problem is waiting for a technician.
The firm line sits here: live electrical components, motor and belt replacement, control board repair, suspension systems, and sealed tub bearings are technician-only work.
These involve high voltage, heavy parts, specialized tools, or all three.
Bearing jobs in particular often require splitting the tub, which is beyond any reasonable DIY scope.
Repair or replace: The real factors
You’ve probably heard the rule that a washer older than 8 to 10 years isn’t worth fixing. It’s a decent rough guide, but it ignores the details that actually drive a smart repair-versus-replace decision.
Start with severity.
A $40 door latch on a 9-year-old machine is an easy yes.
Failed tub bearings on a 4-year-old budget model may not be.
Then check parts availability, because some brands stop stocking parts for older models, and a repair you can’t source isn’t a repair.
Compare repair cost against replacement cost.
A common benchmark is that if the repair exceeds about half the price of a comparable new washer, replacement usually makes more sense.
Factor in repeat failures too, since a machine on its third service call in two years is telling you something.
Finally, check for manufacturer safety recalls.
Search your model number on the manufacturer’s site and the U.S. Consumer Product Safety Commission database.
A recall can mean a free repair or replacement, and you’d be surprised how many owners never check.
What to tell a repair technician
The fastest repairs start before the technician arrives. When you call or message, give them the washer type (top-load or front-load), the brand and model number, and the exact error code as it appears on the display, character for character.
Add the cycle stage when it fails (filling, washing, draining, or spinning), the leak location if there is one, and a plain description of any noise, such as grinding, humming, or banging. Mention any recent install or move too, since many faults follow a relocation that kinked a hose or skipped the shipping bolts.
Photos make this even better.
A clear shot of the model plate and another of the leak location let a technician identify likely parts before the visit, which can mean one trip instead of two.
Apps like Frendex make this straightforward: you can message a verified local appliance technician with this exact information upfront, compare real photos and ratings from completed jobs, and book a time slot without guessing which part to authorize.
The bottom line
Run the safety steps and quick checks tonight before assuming the worst.
Many “broken” washers turn out to be a setting, a lock, or a clog.
That’s a ten-minute fix, not a new appliance.
Use this simple rule.
If the fault is electrical, structural, or inside a sealed component, stop and book a technician.
If it’s a hose, filter, or setting, it’s safe to try yourself first, as long as the power is off and you can reach the machine without strain.
And going forward, a little preventive maintenance goes a long way.
Measure detergent carefully, keep loads balanced, and inspect your hoses every few months (replacing rubber supply hoses roughly every five years).
Those three habits prevent most repeat service calls.
Frequently asked questions
Is it worth repairing a washing machine?
A washing machine is worth repairing when the repair costs less than about half the price of a comparable new model and parts are still available. Age alone isn't the deciding factor. Also check your model number against manufacturer and CPSC recall lists, since a recalled unit may qualify for free service.
What is the most common problem with a washing machine?
Drainage problems and unbalanced loads are the most common real-world washer complaints. Clogged filters, kinked drain hoses, and objects in the pump cause most drain issues. Unbalanced loads and poor leveling cause most shaking and no-spin complaints.
Why is my washing machine not spinning but still draining?
A washer that drains but won't spin usually has a lid lock, unbalanced load, or settings issue, not a motor fault. The machine needs the lid or door lock to confirm it's closed and the load to be balanced before it will spin up. Check the cycle setting too, since delicate and no-spin options keep speed low.
Why is my washing machine not draining but making a humming noise?
A humming washer that won't drain most likely has a blocked or jammed drain pump impeller. The pump motor is receiving power but can't turn because something (often a sock, coin, or hair tie) is stuck. This is different from a dead pump motor, which typically makes no sound at all.
How do you reset a washing machine?
You reset most washing machines by unplugging them or switching off the breaker for one to five minutes, then restoring power. Some models also have a manufacturer reset button combination listed in the owner's manual. If the same fault reappears immediately after the reset, the problem is mechanical or electrical and needs a technician.
When should I call a professional for a washing machine repair?
Call a professional immediately if you notice an electrical or burning smell, a breaker that trips repeatedly, or visible water coming from a sealed component like the tub seal. You should also call when a reset doesn't hold or the fault involves the motor, belt, control board, suspension, or bearings. These jobs carry real shock and injury risk.
Need a hand with something?
The Frendex map shows you who is available near you, in real time.
Get the app free Get the app freeFree, no card needed
Related articles

Pest control cost in 2026: What you'll really pay
Real 2026 pricing for one-time visits, recurring plans, and termite or bed bug jobs. Learn what drives $95 vs $1,400 quotes before you sign.
Boiler maintenance: A homeowner's safety and service guide
Learn which boiler checks are safe to DIY, which need a pro, and the warning signs that mean call for help now. A homeowner's framework for 2026.

Rodent control: A homeowner's step-by-step guide
Skip the trap-and-hope cycle. This 8-step IPM method shows why sealing entry points matters more than traps. See the full sequence inside.